


How to Use Frozen Shoulder Ice Packs Safely
-
You're probably standing in the kitchen, one hand on the counter, testing whether you can reach into a cabinet or pull a seatbelt across your chest without that sharp shoulder catch. That's the moment most sufferers reach for frozen shoulder ice packs, hoping the cold will somehow loosen the joint and make the stiffness disappear.
It won't thaw the capsule. What ice can do, and do well, is calm pain enough to let you move with less guarding, especially after activity or during a painful flare. The trick is using it for the right job, at the right time, with the right precautions.
Table of Contents
- The Role of Cold Therapy in Shoulder Recovery
- Understanding Adhesive Capsulitis and Symptom Management
- Step by Step Application for Safe and Effective Relief
- Deciding Between Ice for Pain and Heat for Stiffness
- Choosing the Right Wrap and Pack Design for the Joint
- Common Pitfalls and When to Seek Professional Guidance
The Role of Cold Therapy in Shoulder Recovery
A lot of people reach for ice expecting it to loosen a frozen shoulder, then feel let down when the joint still moves like a stuck hinge. That expectation misses the point. Cold does not reverse the thickened capsule behind adhesive capsulitis, and it should not be treated as a cure PMC review on adhesive capsulitis.
What it can do is lower pain enough to make home care more tolerable. Frozen shoulder often brings pain, stiffness, and reduced shoulder function, but it usually improves gradually over time. Conservative care, including pain control, mobility work, and rehabilitation, is usually effective, and reviews describe good outcomes with this approach PMC review on adhesive capsulitis.
Practical rule: use cold after activity when pain is the issue. Use heat before activity when stiffness is the main barrier.
That stage-based split matters. After exercises, reaching, or a long day with the shoulder irritated, an ice pack can reduce the ache and cut down guarding. Before stretching or mobility work, warmth often makes the shoulder feel easier to move because it addresses stiffness rather than post-activity soreness. Ice should support the plan, not replace assessment, exercise, physical therapy, and other treatments when they are needed PMC review on adhesive capsulitis.
Understanding Adhesive Capsulitis and Symptom Management
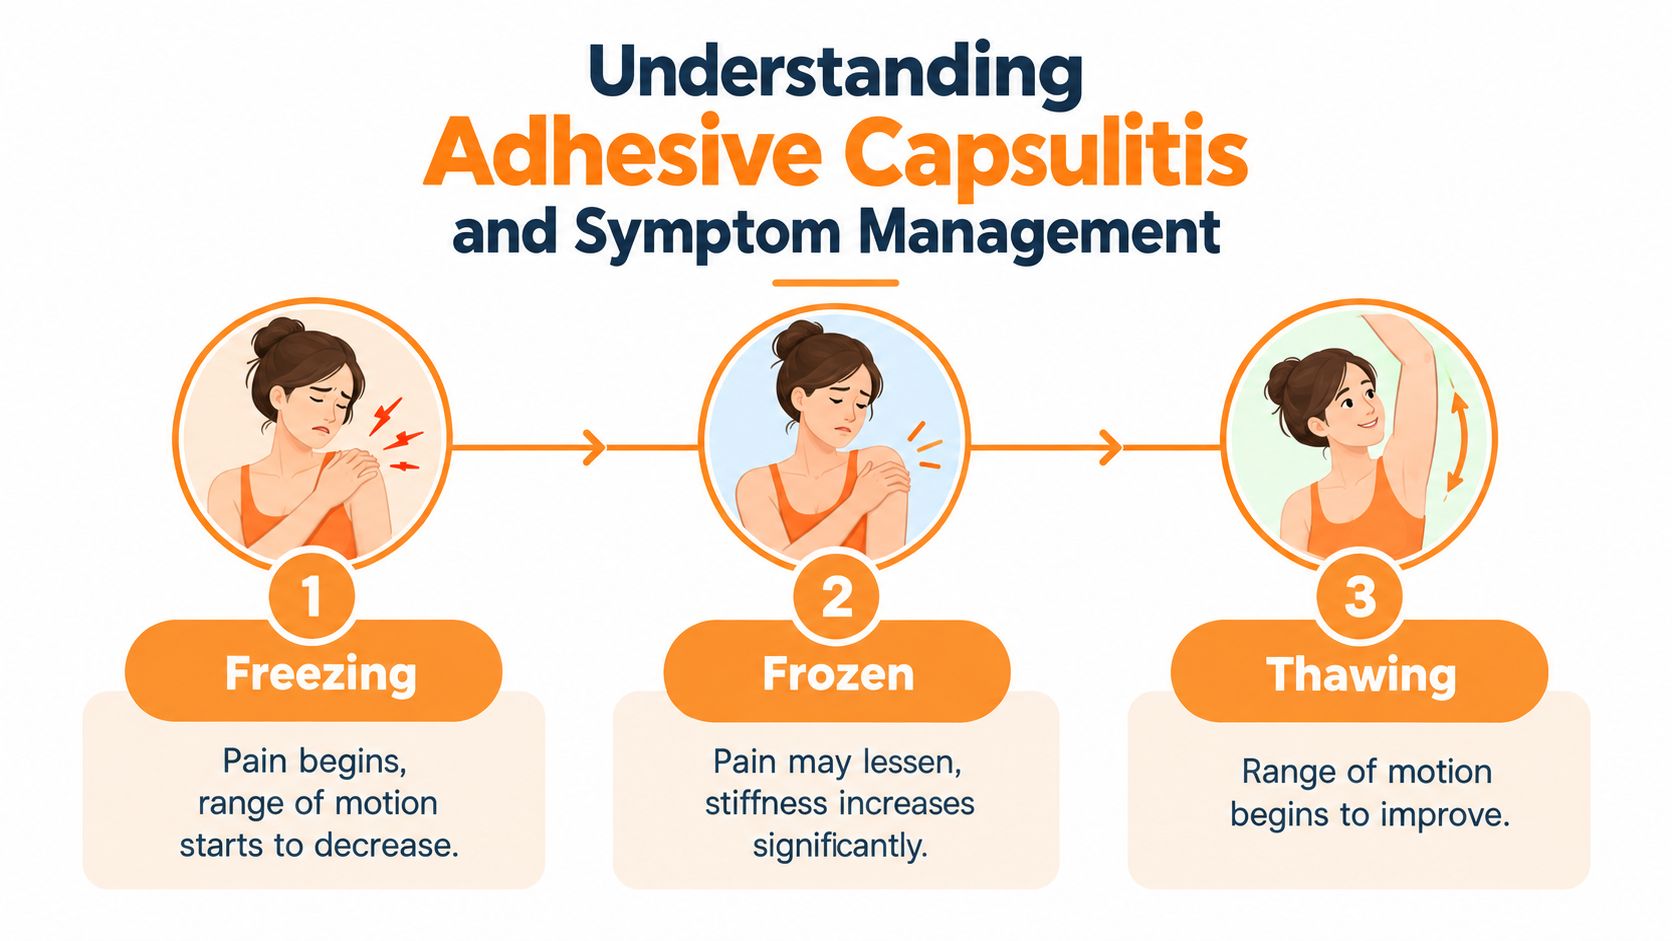
Frozen shoulder, or adhesive capsulitis, shows up most often during the fourth to sixth decades of life and is reported more often in women than men PMC review on adhesive capsulitis. The condition affects an estimated 2% to 5% of the general population, so it's common enough that many people end up trying home remedies before they ever get a formal diagnosis PMC review on adhesive capsulitis.
The day-to-day reality is simple, even if the diagnosis isn't. People feel pain when reaching overhead, behind the back, or across the body, and those movements become guarded because the shoulder hurts before it moves well. That's why symptom management matters, it keeps you participating in rehab instead of avoiding motion altogether.
If pain is making you skip mobility work, the goal is to lower the threat level enough that you can move again. That can include pain control, exercise pacing, and, for some people, short-term cold after activity. For readers also thinking about broader self-care, a practical guide like starting an anti inflammatory diet tomorrow may be useful as one part of a wider routine, but it doesn't replace shoulder-specific treatment.
How the timeline shapes the plan
The shoulder usually doesn't “snap back” because of one intervention. It improves gradually, and the rehab plan has to match the stage you're in. In the painful, freezing phase, comfort tools may help you tolerate movement. In the stiffer frozen phase, the focus shifts even more toward structured mobility, because the joint isn't going to unstick from passive rest.
Evidence reviews also note that the data supporting common modalities like heat and ice are limited, so the honest promise is temporary relief, not cure PMC review on adhesive capsulitis. That's why cold is best treated as a way to stay in the game while the broader plan does the actual work.
Step by Step Application for Safe and Effective Relief
A cold pack should feel like relief, not like a skin injury waiting to happen. The safest routine is simple and controlled, because shoulder icing works best when it stays brief and deliberate.
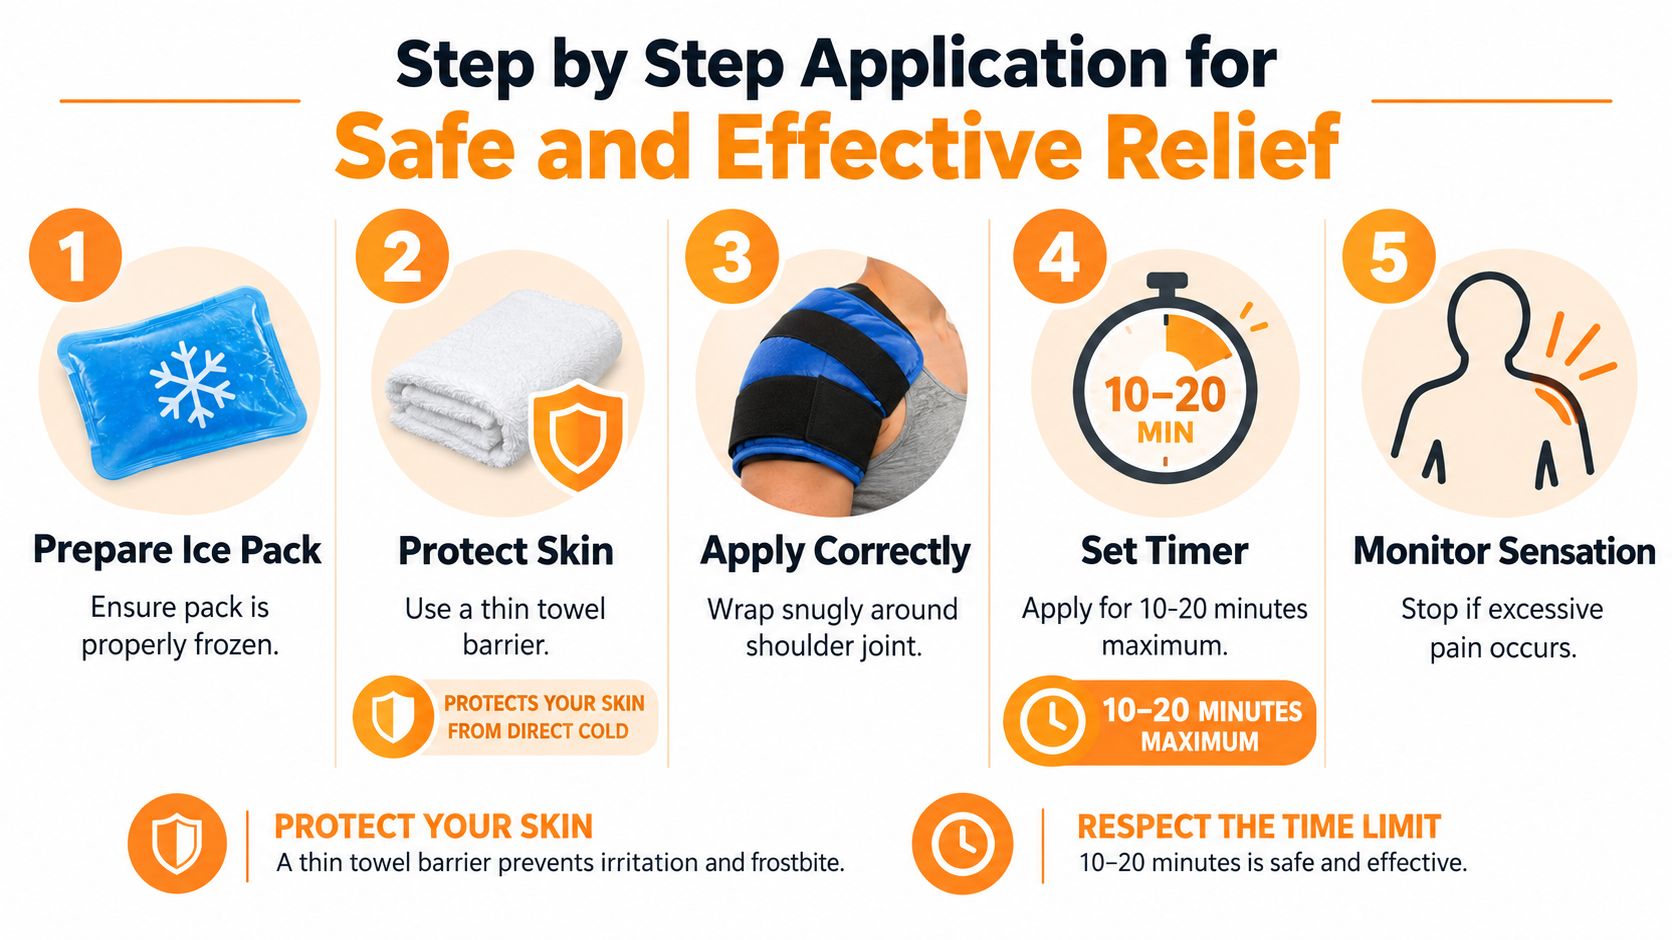
Use a thin barrier every time. Direct contact raises the risk of skin damage, and there's no upside to proving your tolerance to cold.
The practical window is about 10 to 20 minutes, with a cloth barrier between skin and pack, and that timing is part of the standard protocol in the JOSPT clinical guidance. Set up the pack before you sit down, because once the shoulder starts to numb, it is easy to lose track of time. Place it over the painful part of the joint, not just the top of the shoulder, and keep it snug enough to stay put without squeezing.
A simple home protocol
- Prepare the pack. Use a flexible reusable pack that is cold but not rock-hard, so it can contour to the shoulder.
- Add a cloth barrier. A thin towel or shirt layer protects the skin and lowers the chance of an ice burn.
- Position it over the joint. Aim for the front and outer shoulder where symptoms are often felt, then adjust if the cold is missing the sore spot.
- Set a timer. Stop at 10 to 20 minutes rather than guessing by feel.
- Check sensation and skin. Look for marked pallor, mottling, numbness, or burning, and remove the pack if any of those show up.
A frozen-shoulder program described in the literature used mobility work followed by cold-pack application, which fits the pattern many patients need, movement first, relief after. For a comparison of pack shapes and setups, see our guide to the ice bag for injuries. SunnyBay's shoulder-focused cold and heat accessories are one option among several. The key is fit and safety, not branding.
The demo below shows how to position the pack over the front and outer shoulder without it sliding toward the biceps.
Deciding Between Ice for Pain and Heat for Stiffness
A frozen shoulder often feels different depending on the time of day and what you just did. The practical choice is not “hot or cold” in the abstract, it is whether you are trying to calm post-activity pain or ease pre-activity stiffness.
| Therapy Type | Best Used For | Timing | Primary Benefit |
|---|---|---|---|
| Ice | Post-activity soreness, pain after exercises, or a painful flare | After movement or later in the day | Short-term analgesia and calming irritation |
| Moist heat | Pre-activity stiffness and guarded motion | Before stretching or mobility work | Muscle relaxation and easier participation in movement |
If the shoulder feels tight and guarded before you start moving, heat usually has the better payoff. It can make stretching and mobility work feel more tolerable. If the shoulder feels sore after reaching, exercise, or a painful flare, ice is the better match because it can reduce pain and settle irritation NHS frozen shoulder guidance.
The NHS guidance also notes that ice may help with pain and inflammation, while heat may support muscle relaxation. For patients who need a simple rule, I use this: heat before movement when stiffness is the main barrier, ice after movement when pain is the main problem. The same guidance recommends moist heat before exercises to reduce pain and improve movement, which fits that stage-based approach. A broader comparison of heat therapy vs cold therapy covers the trade-offs, but frozen shoulder usually responds best when you match the treatment to the moment.
That means you do not need to pick one tool for the entire day. Use heat to get moving, then use ice if the shoulder protests afterward. For the underlying recommendations, see the NHS frozen shoulder guidance.
Choosing the Right Wrap and Pack Design for the Joint
A shoulder isn't a flat surface, so a rectangular block of ice often loses contact exactly when you need it most. The best pack is the one that stays in place without forcing you to hold it there with your hand.
What to look for in a shoulder pack
- Contoured shape: A curved pack sits better over the joint than a rigid slab that keeps slipping off.
- Adjustable straps: Hands-free designs let you sit, read, or do light tasks without babysitting the pack.
- Flexible fill: Gel or natural-fill designs mold more easily around the shoulder's front and outer contours.
- Reusable construction: If you'll use cold more than once, durability matters more than novelty.
The goal is even contact, not maximum freezing. A pack that sits securely over the shoulder capsule usually does more useful work than a colder pack that keeps sliding toward the biceps or upper back. For home care, that matters because your pain map changes throughout the day, and a stable wrap gives you repeatable placement.
A frozen-shoulder cold pack should also be easy to remove fast. If you have to fight Velcro, straps, or bulky hardware, you're less likely to use it correctly. I prefer designs that can be tightened, checked, and taken off in seconds.
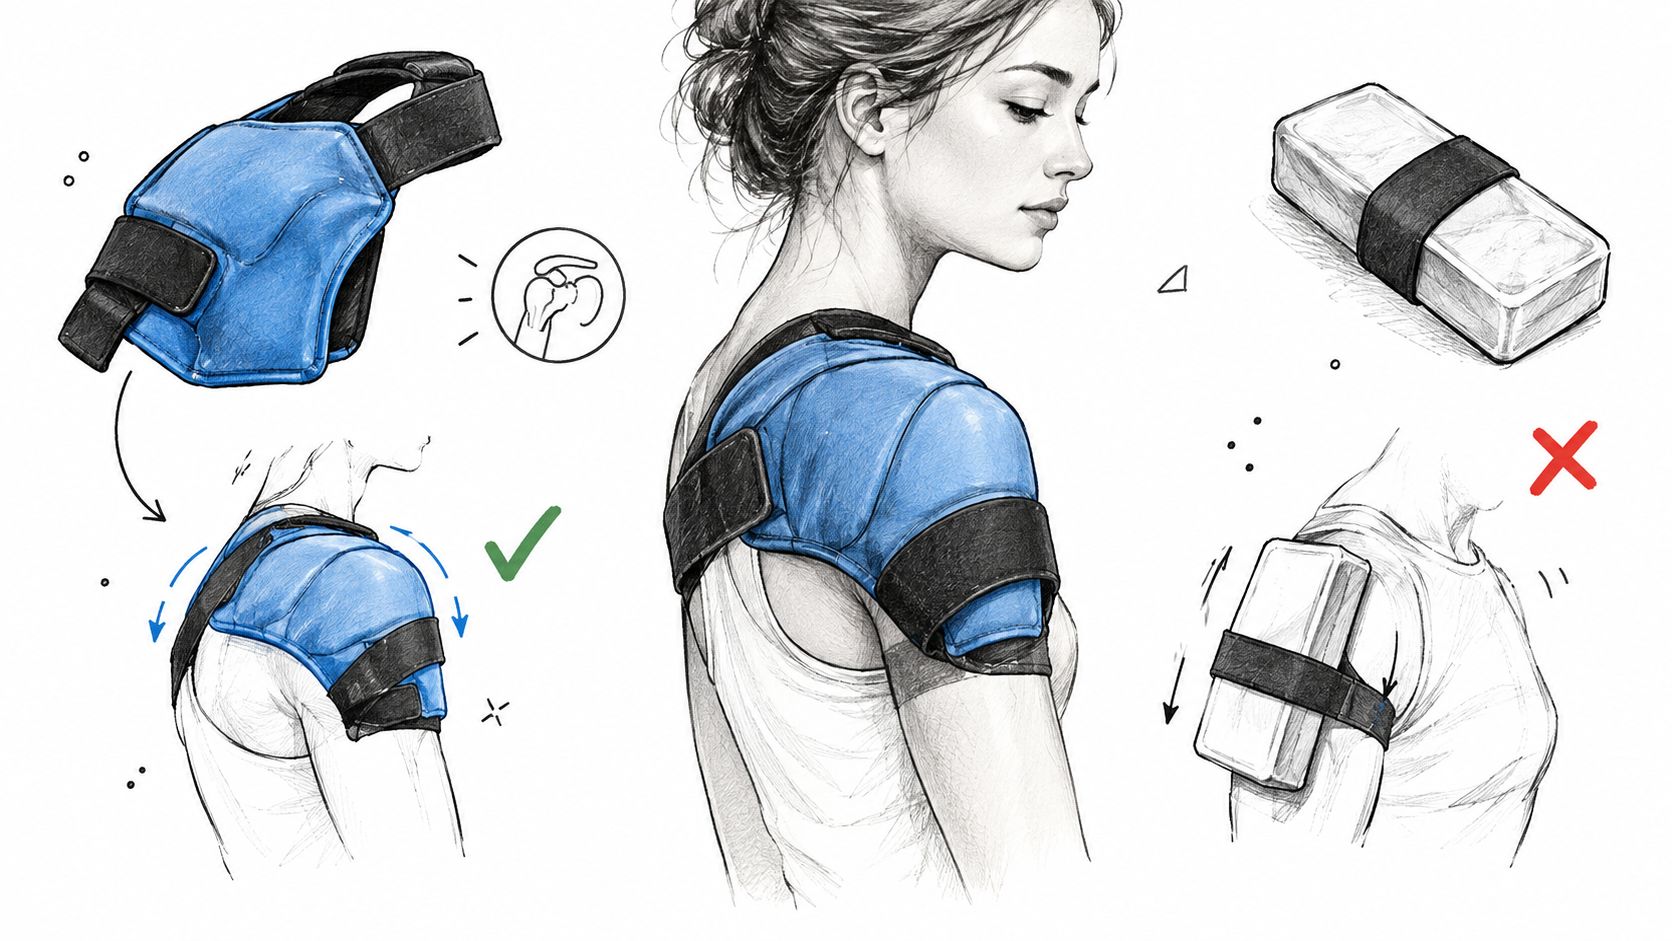
For readers comparing options, how to wear a shoulder wrap is a useful reference when fit and strap placement matter. The main idea is simple, if the wrap can stay aligned over the painful part of the joint without your help, you'll use it more consistently and with less frustration.
Common Pitfalls and When to Seek Professional Guidance
The biggest mistake I see is someone icing right before they try to bully the shoulder into a hard stretch. That numbing effect can mask loading that's too aggressive, and a flare afterward can set rehab back for days.
Another pitfall is assuming that more cold means more progress. It doesn't. Exceeding the time limit, falling asleep with the pack on, or pressing a frozen pack directly on bare skin can all create avoidable problems. If you see numbness, marked pallor, burning, mottling, or the pain gets worse instead of better, stop right away JOSPT clinical guidance.
If the pack hurts more than the shoulder, the pack has stopped doing its job.
Evidence specifically testing ice for adhesive capsulitis is limited, and even small studies can't tell you whether a reusable household pack changes the course of the condition Frozen shoulder cold therapy study. A short trial is reasonable, but the standard for success is simple symptom response, not a promise of recovery.
Seek professional guidance if pain keeps blocking movement, if stiffness keeps worsening, or if you've been managing at home without meaningful change. A physical therapist or orthopedic clinician can check whether the shoulder pattern really fits adhesive capsulitis and help you match treatment to the stage you're in. That's the point where home comfort tools should support care, not replace it.
If you're building a home routine, SunnyBay carries shoulder-focused hot and cold therapy options, including wraps and reusable packs that fit everyday use. For a practical setup that matches this topic, visit SunnyBay and look for gear that stays secure, protects the skin, and makes it easier to keep moving.


