


How to Wear a Shoulder Wrap for Real Relief
-
You're halfway through answering an email when the ache catches your attention again. You reach for a shoulder wrap with one hand, pull the strap across your chest, and feel the heated panel slide up toward your neck. A few minutes later, the warmth is concentrated over the trapezius while the sore outer shoulder is barely covered. Tightening it solves the slipping problem only partly, because now your fingers tingle and the strap feels restrictive.
That's why how to wear a shoulder wrap matters as much as which wrap you buy. A shoulder wrap is a delivery system. It has to keep its thermal surface over the intended tissue, maintain even contact while you move, and leave enough room for normal breathing and circulation. The practical details below focus on the problems that repeatedly cause poor results, including wrong placement, loose straps, bunching fabric, and excessive exposure.
Table of Contents
- Why a Shoulder Wrap Only Works If It Fits
- Choosing the Right Wrap Style Before You Put It On
- Putting On Your Shoulder Wrap Step by Step
- Placing the Wrap Where the Pain Actually Lives
- Heat Timing and Safety for Daily Use
- Fixing the Most Common Fit Problems
Why a Shoulder Wrap Only Works If It Fits
A wrap can feel pleasantly warm and still miss the structure you're trying to treat. If the panel drifts upward, most of the heat reaches the upper trapezius and side of the neck. If it hangs too low, the warmth may sit over the middle of the upper arm rather than the shoulder joint. The skin feels heat, but the wrap isn't delivering it evenly across the target area.
The first fitting test is simple. The wrap should sit snugly without creating numbness, tingling, color change, or persistent marks. Clinical guidance recommends checking the support regularly during the first few days and adjusting the straps so you can breathe normally and maintain circulation. These fit principles are also useful when comparing heating pad sizes and shapes, because a larger panel isn't automatically more effective if it can't stay anchored.
What a good fit feels like
A correctly positioned shoulder wrap should move with you rather than fight you. The thermal surface should lie flat over the shoulder and upper trapezius, with no folded heating element, open gap, or edge digging into the armpit. You should be able to sit at a desk, raise the arm forward, and make a controlled outward rotation without the panel rolling away from the painful area.
Practical rule: If you keep adjusting the wrap every few minutes, the problem is usually placement or anchoring, not a lack of heat.
A loose wrap wastes the session because warmth reaches the skin unevenly. An over-tight wrap creates a different problem, compressing sensitive tissues and making the wearer less likely to complete the recommended session. The useful middle ground is firm contact with comfortable circulation.
Why placement beats intensity
Turning up the heat won't compensate for a panel sitting in the wrong location. For superficial heat therapy, close and even contact matters, and the wrap should be positioned over the shoulder and upper trapezius rather than left to migrate during movement. Heat can support short-term comfort and mobility, but it works best as an adjunct to gentle exercise or range-of-motion work, not as a standalone fix, as described in stiff shoulder advice and exercises.
The fitting process exists for one reason: to keep the thermal surface on the tissue that needs it. Once the wrap stays put, the session becomes controlled therapy instead of repeated guesswork.
Choosing the Right Wrap Style Before You Put It On
Start with the construction, not the color or filling. Your shoulder's mobility, the activity you'll do while wearing the wrap, and the type of pain you're managing should determine how the wrap fastens.
A strap-and-closure wrap opens flat and uses elastic belts or hook closures around the upper arm and chest. It usually offers the most control over placement, which makes it useful when shoulder rotation is limited or when the panel needs to stay over a very specific landmark. The trade-off is that fastening it can be awkward with one painful arm.
A full-sleeve microwaveable wrap pulls over the arm and drapes around the deltoid. It's quick to put on, but narrow shoulders can let the sleeve ride upward, especially during typing or reaching. A hands-free weighted or compression wrap may use a chest strap, hook closure, or built-in weight to improve contact. It can feel more secure over the joint, though added pressure and warmth may make it less comfortable during a long desk session.
| Wrap Style | Best For | Trade-off |
|---|---|---|
| Strap-and-closure | Frozen shoulder or limited rotation | More precise, but harder to fasten one-handed |
| Full-sleeve | Quick use and low-effort fitting | Can ride up on narrow shoulders |
| Weighted or compression | Bursitis-type discomfort and firm contact | May feel warmer and require adjustment |
Match the style to the task
For a frozen shoulder, choose a wrap that opens flat and can be positioned without forcing the arm through a tight sleeve. A low-profile strap design suits rotator cuff pain that flares while working, because it creates less bulk beneath clothing or against a chair. Bursitis often benefits from a design with an additional strap across the joint line, provided the pressure remains comfortable.
If you're comparing soft, washable body-wrap materials before choosing a shoulder-specific design, this guide to towelling body wraps from SEYANTE offers useful context on fabric feel and wrap construction. Material affects comfort, but it doesn't replace a secure fit.
Before heating the wrap, confirm where the closure sits and whether you can operate it without twisting the painful shoulder. A wrap that fits perfectly in theory but can't be fastened safely in practice will end up loose, crooked, or abandoned. For microwaveable options, review how to choose a microwavable body heating wrap and select a shape that follows the shoulder rather than forcing the joint into an awkward position.
Putting On Your Shoulder Wrap Step by Step
The reliable sequence is warm, locate, position, secure, and move-check. It works for either shoulder and for both flat-opening and sleeve-style wraps.
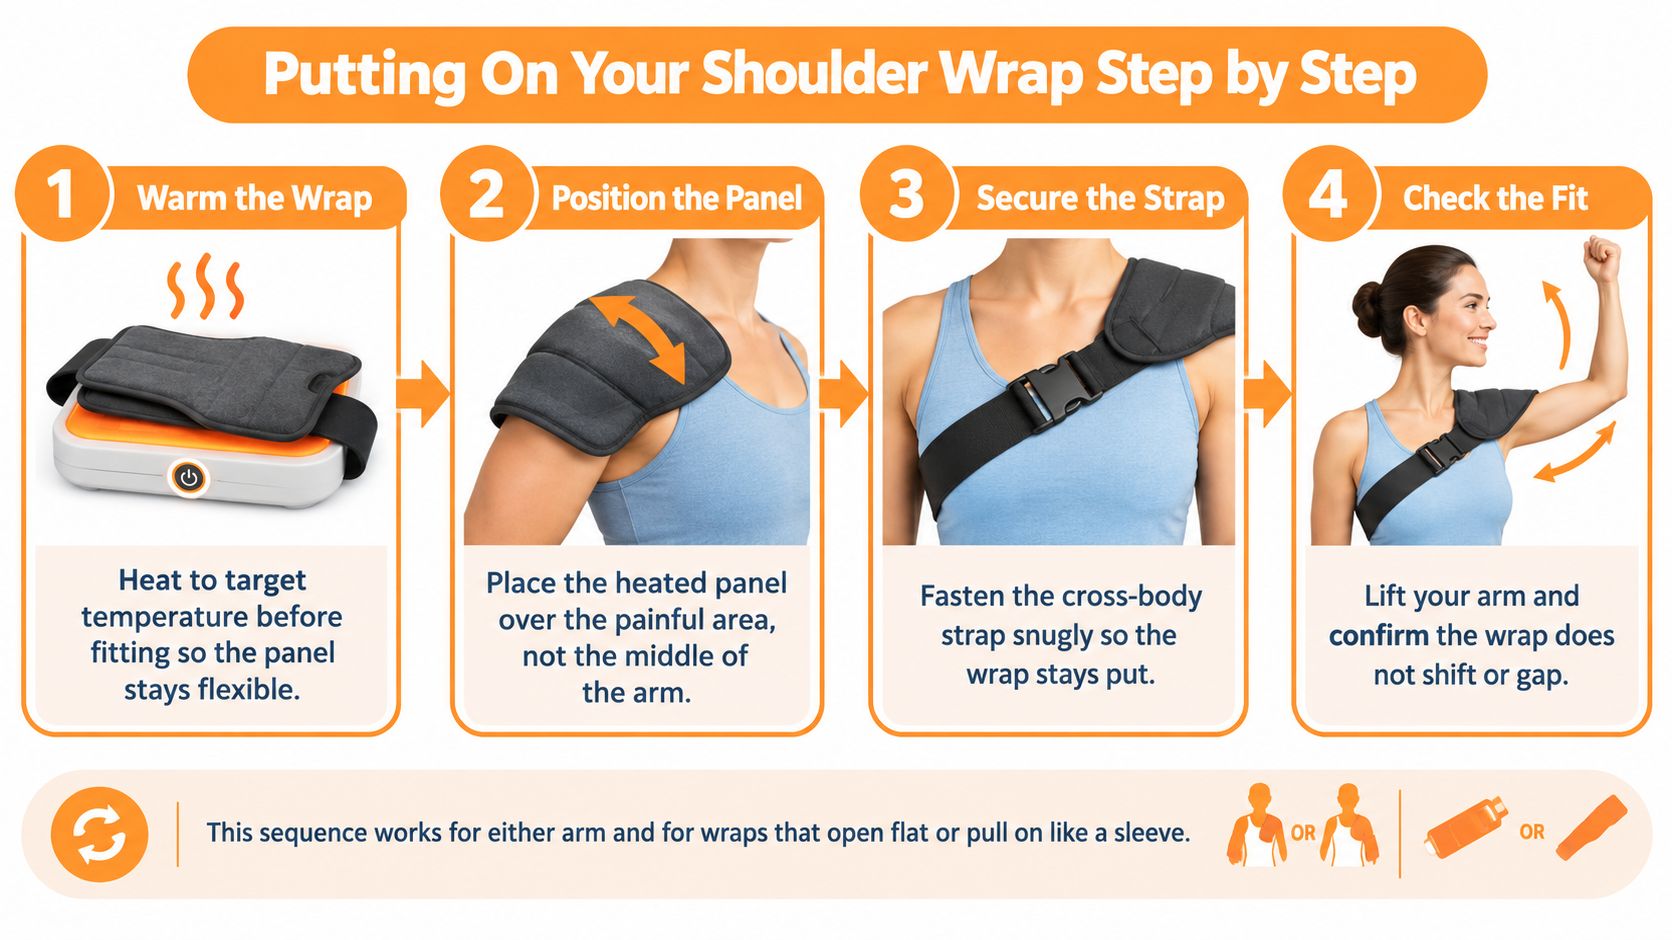
Prepare the wrap and the body
Heat the wrap according to the manufacturer's instructions before putting it on. The panel should be warm and flexible when it reaches the shoulder, not stiff, folded, or overheated in one area. Use a cloth barrier or the wrap's intended cover rather than placing a heated surface directly on bare skin.
Identify the painful landmark first. Don't start by pulling the wrap toward your body and hope the panel lands correctly. Stand or sit upright, find the outer shoulder and the bony ridge at the top of the joint, then guide the wrap toward that point.
Fit a flat-opening wrap
- Place the main panel. Slide the heated panel across the upper arm so its widest section covers the lateral deltoid line and the outer shoulder.
- Bring the chest strap across. Pass the strap under the opposite armpit and fasten it at the front of the chest. It should hold the panel in place while allowing two fingers to slide underneath.
- Close the secondary strap. Position the upper-arm strap across the bicep or deltoid area. Its purpose is to stop the panel rotating away from the joint.
- Check movement. Raise the arm forward to shoulder height, then make a gentle outward rotation. The wrap shouldn't gap, pinch, or shift toward the neck.
Fit a sleeve-style wrap
Gather the opening like a sock rather than stretching it aggressively. Slide the arm through, then pull the wrap back until the broad thermal panel sits over the rotator cuff area, not the middle of the bicep. Smooth the fabric with your free hand before fastening any closure.
A useful reference for broader shoulder symptoms is this guide to shoulder pain relief, particularly if pain or restricted movement makes basic fitting difficult. A wrap shouldn't force you to lift or rotate the arm beyond what feels controlled.
Once the wrap is secure, sit at your usual workstation or perform the gentle movement you plan to use afterward. If the panel moves during that test, fix the anchoring before beginning the session. Heat applied to the wrong place won't become more useful because you leave it on longer.
For a visual demonstration of how a shoulder wrap is positioned and secured, watch the following fitting reference:
Placing the Wrap Where the Pain Actually Lives
The middle of the upper arm is an easy target, but it's often not the right one. Shoulder pain can come from structures around the joint, so the thermal surface should follow the suspected pain pattern and a clear body landmark.
Rotator cuff pain
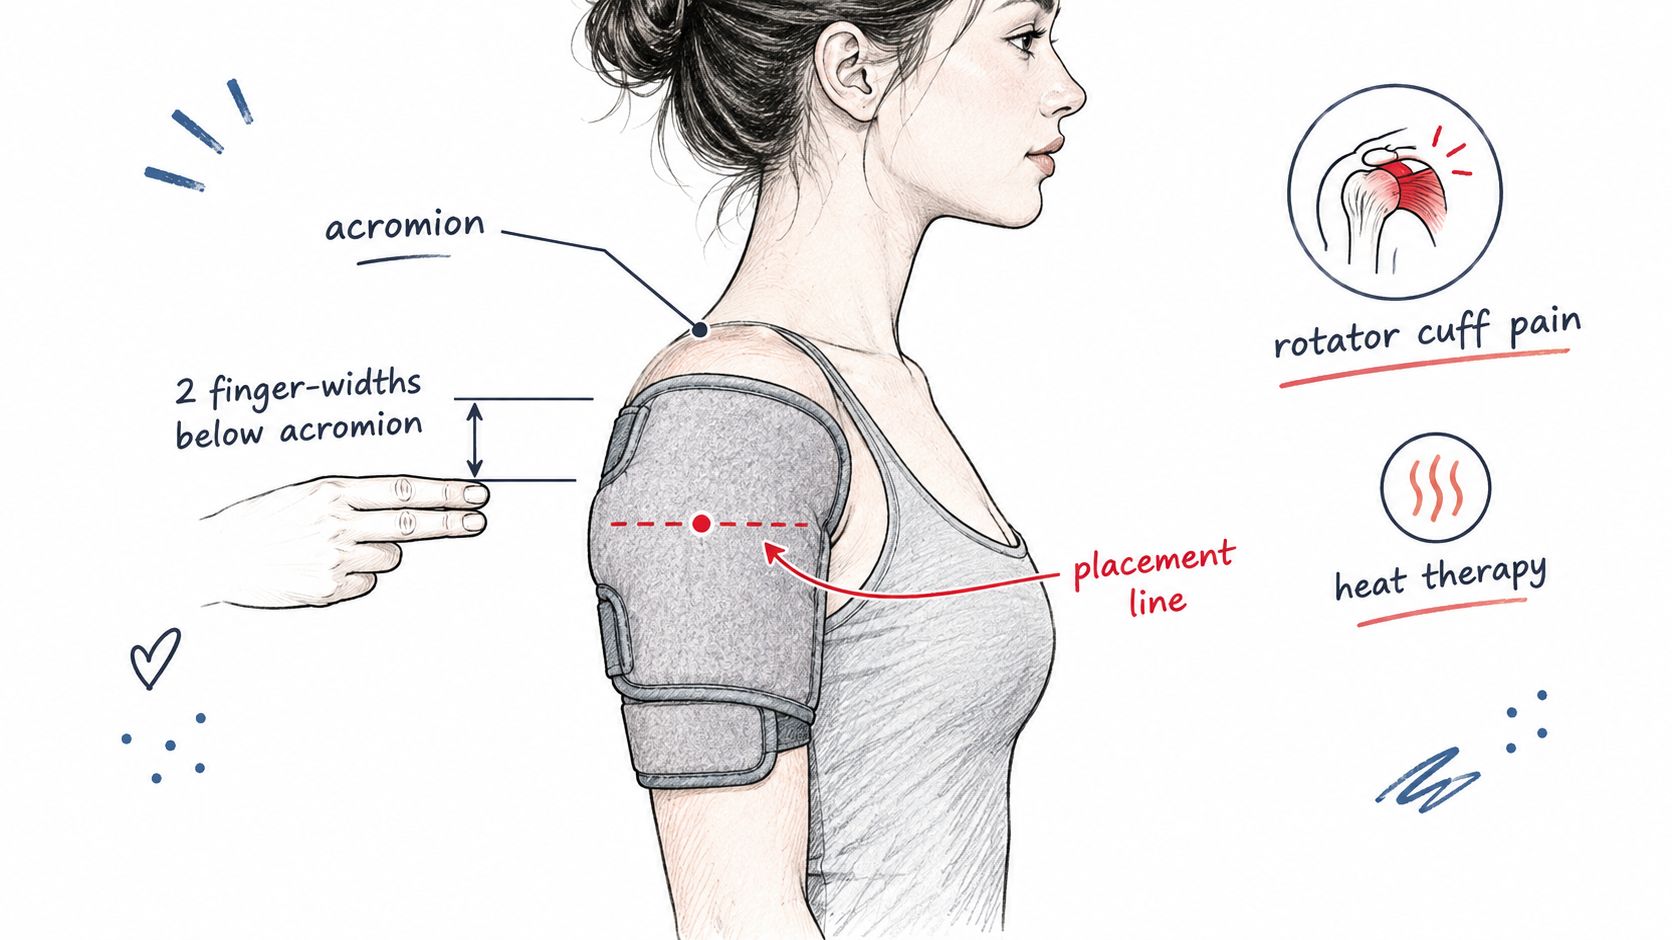
For rotator cuff discomfort, place the panel over the outer upper shoulder, approximately two finger-widths below the acromion, the bony point at the top of the shoulder. This position lets the wrap cover the area around the supraspinatus and infraspinatus tendons instead of drifting toward the neck or settling over the bicep.
Keep the upper edge close to, but not directly pressing into, the bony ridge. The panel should follow the curve of the shoulder and remain flat when the arm moves. A secondary upper-arm strap can help prevent the wrap from rotating with the deltoid.
Frozen shoulder
Frozen shoulder usually calls for broader coverage than a small focal patch. Center the wrap over the front of the shoulder capsule, then allow the panel to extend toward the back of the shoulder and the scapular spine. The purpose is to warm a wider region before controlled mobility work, not to create a narrow hot spot.
Heat-therapy guidance commonly recommends 15 to 20 minutes before stretching in frozen shoulder cases, while a clinical comparison reported measurable improvements after 8 hours of wrap use, including 5.5% greater shoulder flexibility and 12–16% improvements in shoulder and neck range-of-motion measures. Those findings support heat as a preparation for movement, not a replacement for rehabilitation. See the detailed clinical heat-therapy comparison for the study context.
Bursitis-type pain
For subacromial bursitis, position the panel beneath the bony ridge at the top of the shoulder, with its upper edge tucked just below the acromion. Avoid placing firm pressure directly over a tender swollen point. The wrap should make broad contact around the joint line without crushing the space beneath the bony arch.
Recheck the panel after about 10 minutes if it's beginning to migrate, because warmth can soften fabric and make a loose wrap shift. Avoid heat over red, swollen, or recently injured tissue. If you're also exploring pain management without medication, treat heat as one supportive tool rather than assuming it explains or resolves the underlying problem.
Heat Timing and Safety for Daily Use
Heat should be treated as a dose, not as background comfort. Physical-therapy-oriented guidance often recommends 15 to 20 minutes per session, with a rest interval between applications, while some product instructions describe cycles of 20 minutes on and 20 minutes off, repeated 3 to 4 times daily. Follow your product instructions first, because a microwaveable wrap, an electric pad, and an air-activated product don't have identical heat behavior. The ThermaCare neck and shoulder guidance illustrates why wear time varies between product types.
| Heat Setting | Max Session Length | Rest Between Sessions | Daily Sessions |
|---|---|---|---|
| Gentle | Follow manufacturer guidance | Allow a clear cooling interval | Follow product or clinician advice |
| Moderate | Commonly 15 to 20 minutes | Use a rest interval between applications | Some instructions describe 3 to 4 cycles |
| Extended-cycle product | Follow the product's stated cycle | Remove and inspect skin during extended use | Follow the label exactly |
What common failures look like
A reader often notices the problem through the skin rather than the shoulder. A red patch, grid-like mark, burning sensation, or increasing irritation means the heat has been too concentrated or the barrier has failed. Remove the wrap, inspect the skin, and don't resume until the area has returned to normal.
Use a cloth barrier and don't place heat directly on bare skin. Avoid using a heated wrap over fresh swelling, a red area, an open incision, or a recently injured shoulder unless a clinician has specifically advised it. People with diabetes or reduced sensation should be especially cautious because they may not feel excessive heat promptly.
A wearable heat-product safety guide recommends removing the wrap at least every 90 minutes during extended treatment to check for skin changes. That isn't a reason to extend a normal session. It's a reminder that unattended continuous heat can create avoidable irritation or burns.
If you use a microwaveable product, reheating safety matters as much as fit. Review microwave heating safety before changing heating times or using a wrap that feels unevenly warm.
Fixing the Most Common Fit Problems
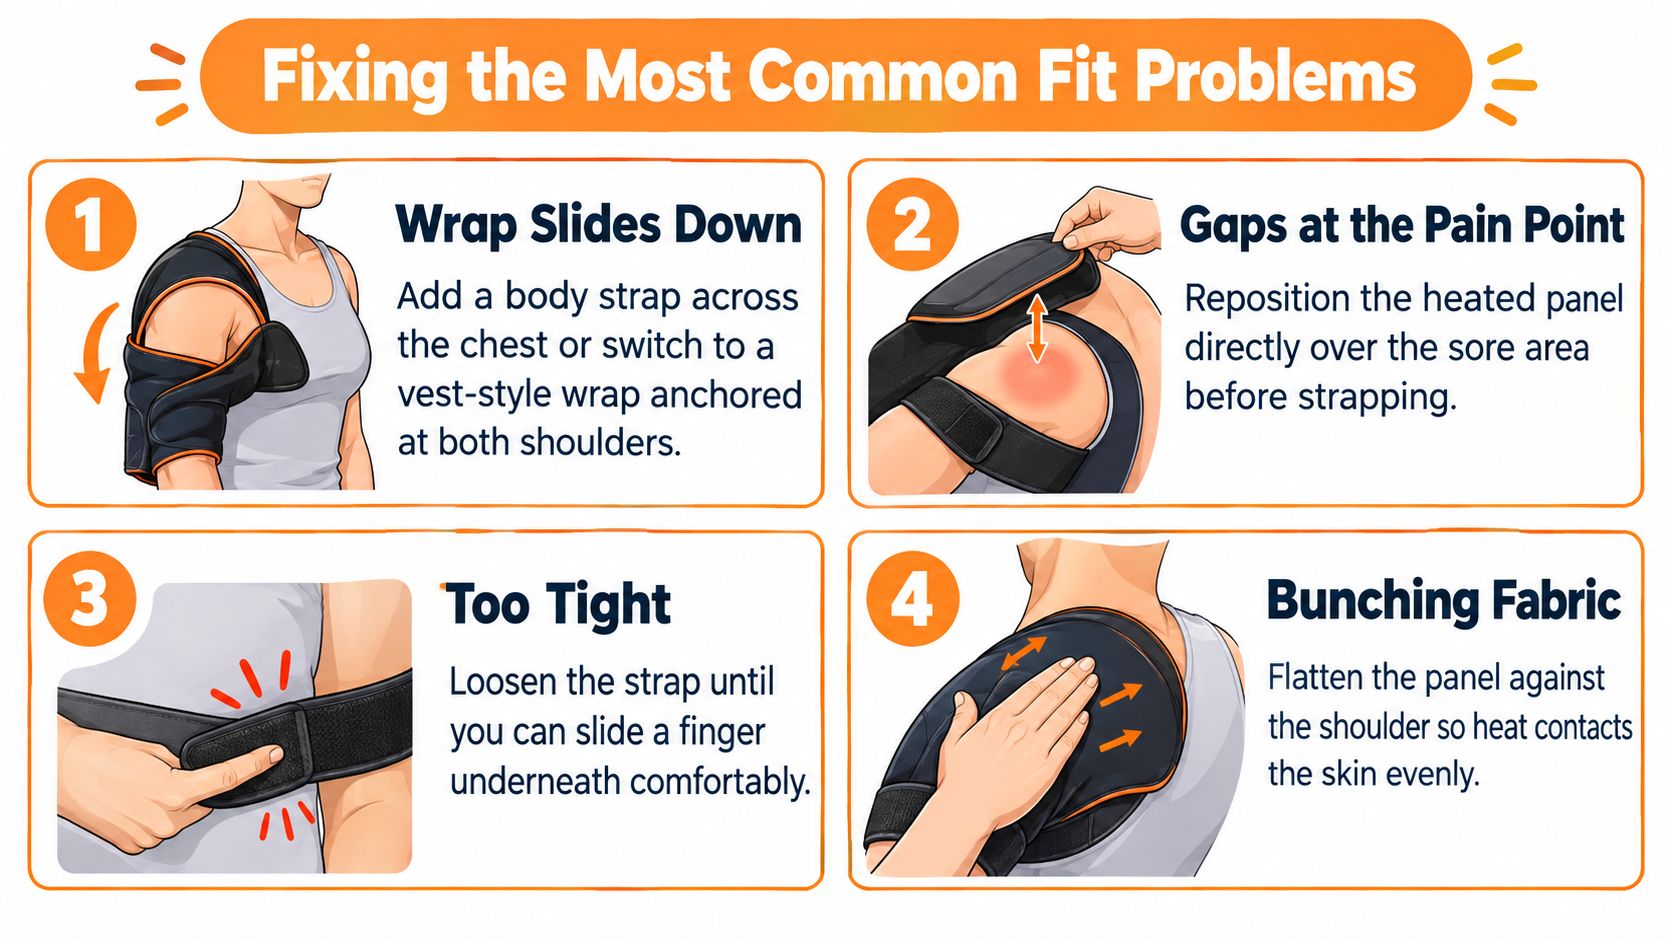
Most complaints fall into four patterns. Each one has a fast correction, but continuing to wear a poorly fitted wrap can turn a useful comfort tool into a source of numbness, hot spots, or frustration.
The wrap slides down. Add a body strap across the chest if the design allows it. If the panel keeps dropping during activity, a vest-style wrap anchored at both shoulders may suit your movement better than a single-arm sleeve. Don't solve downward movement by tightening the upper-arm strap until it leaves marks.
Your fingers tingle or go numb. Loosen the strap by one notch and inspect its path under the armpit. A strap that presses across the brachial plexus can create uncomfortable symptoms. Re-angle it so it crosses the upper back more naturally, then check whether your hand and fingers feel normal.
A hot spot develops. Remove the wrap and smooth the thermal element flat. A folded panel or bunched filling can concentrate heat in one area, especially near the neck. Reposition the element over the painful landmark and restore the cloth barrier before trying again.
The warmth fades quickly. Check whether the panel is sitting over thick clothing, which can reduce contact and bleed warmth into the outer layer. For rechargeable products, follow the manufacturer's instructions for charging and inspect whether the battery is appropriate for that wrap's design. Don't increase exposure time just because the heat feels less noticeable.
Before each session, run this short check:
- Panel: Is the thermal surface over the painful area rather than the center of the arm?
- Contact: Is the fabric flat, with no folds or gaps?
- Tension: Can you breathe normally, and can you slide two fingers beneath the main strap?
- Movement: Does the wrap stay in place during a controlled arm raise?
- Skin: Does the area look and feel normal before and after use?
Heat usually works better as preparation for gentle movement than as a reason to remain completely still. After removing the wrap, use comfortable range-of-motion exercises and stop if pain becomes sharp, unstable, or progressively worse.
SunnyBay offers reusable microwavable shoulder and neck wraps designed to drape over the shoulders, with elastic features that help hold the ends together during use. Visit SunnyBay to compare shoulder heat wraps and related hot and cold therapy tools, then choose a design you can position accurately and wear comfortably.


