


Shoulder Ice Pack Guide: How Long and How to Use Safely
-
Use a shoulder ice pack for 15 to 20 minutes, 3 to 5 times a day, and let your skin rewarm fully between sessions. Always place a damp barrier between the pack and your skin, and check your skin during every session.
You're probably reading this with one hand, shoulder aching after lifting, sleeping on it wrong, or reaching for something that was heavier than it looked. The freezer is open, and you're wondering whether cold will help, how long is safe, and whether you can make things worse by leaving it on. Those are exactly the right questions, because a shoulder ice pack is useful only when the timing, barrier, and skin checks are right.
Table of Contents
- Shoulder Ice Pack Timing at a Glance
- Decide Whether Ice Is Right for Your Shoulder
- Ice Packs, Cold Units and Other Cooling Options
- How to Apply a Shoulder Ice Pack Safely
- Choosing Fit, Straps and Cleaning for Reusable Packs
- Timing Ice Around Exercise and When Heat Works Better
- Why Cold Works and What the Evidence Shows
Shoulder Ice Pack Timing at a Glance
Start with the default. A clinical Shoulder Disorders Guideline recommends 15 to 20 minutes, typically 3 to 5 times per day, with sufficient rewarming between sessions, for temporary relief in acute, subacute, chronic, peri-operative, and rotator-cuff-related pain. That guideline also notes a postoperative shoulder trial protocol used 20 minutes every 2 hours during the initial hospital period, then as needed after 72 hours.
Session Length and Frequency by Situation
| Situation | Session length | Frequency |
|---|---|---|
| Acute shoulder soft-tissue injury | 15-20 min (guideline), 10-15 min (NHS) | 3-5 times per day with rewarming between sessions |
| Early after shoulder surgery, in hospital | 20 min | Every 2 hours |
| After shoulder surgery, after 72 hours | 20 min | As needed |
| Before throwing, lifting or balance work | Do not ice beforehand | Apply after activity instead |
| Reduced sensation or poor circulation | Only with clinician advice | Not applicable |
The two acute injury times don't conflict as much as they appear. The guideline gives the broader 15 to 20 minute window, while the NHS leaflet uses a shorter 10 to 15 minute window with more frequent skin checks. If your skin chills quickly, or this is your first session, choose the shorter end.
After surgery, timing is more intensive at first because you're in a supervised setting. Once that early hospital period passes, use shifts to as needed. Don't copy a hospital schedule at home unless your surgical team tells you to.
Why Longer Is Not Better
Cold causes local vasoconstriction and reduces sensory nerve activity, which is why pain eases. Push past the timer, and excessive cooling can increase stiffness and interfere with rehabilitation exercises you'll need later. Ice also doesn't belong right before activity, so save it for after movement.
Practical rule: pick the row that matches your situation, set a timer before you sit down, and treat the timer as the end of the session, not a suggestion.
Decide Whether Ice Is Right for Your Shoulder
Ice is appropriate when your shoulder is recently injured or swollen, your skin is intact, and your sensation is normal. If one of those three is missing, pause and check before you freeze anything.
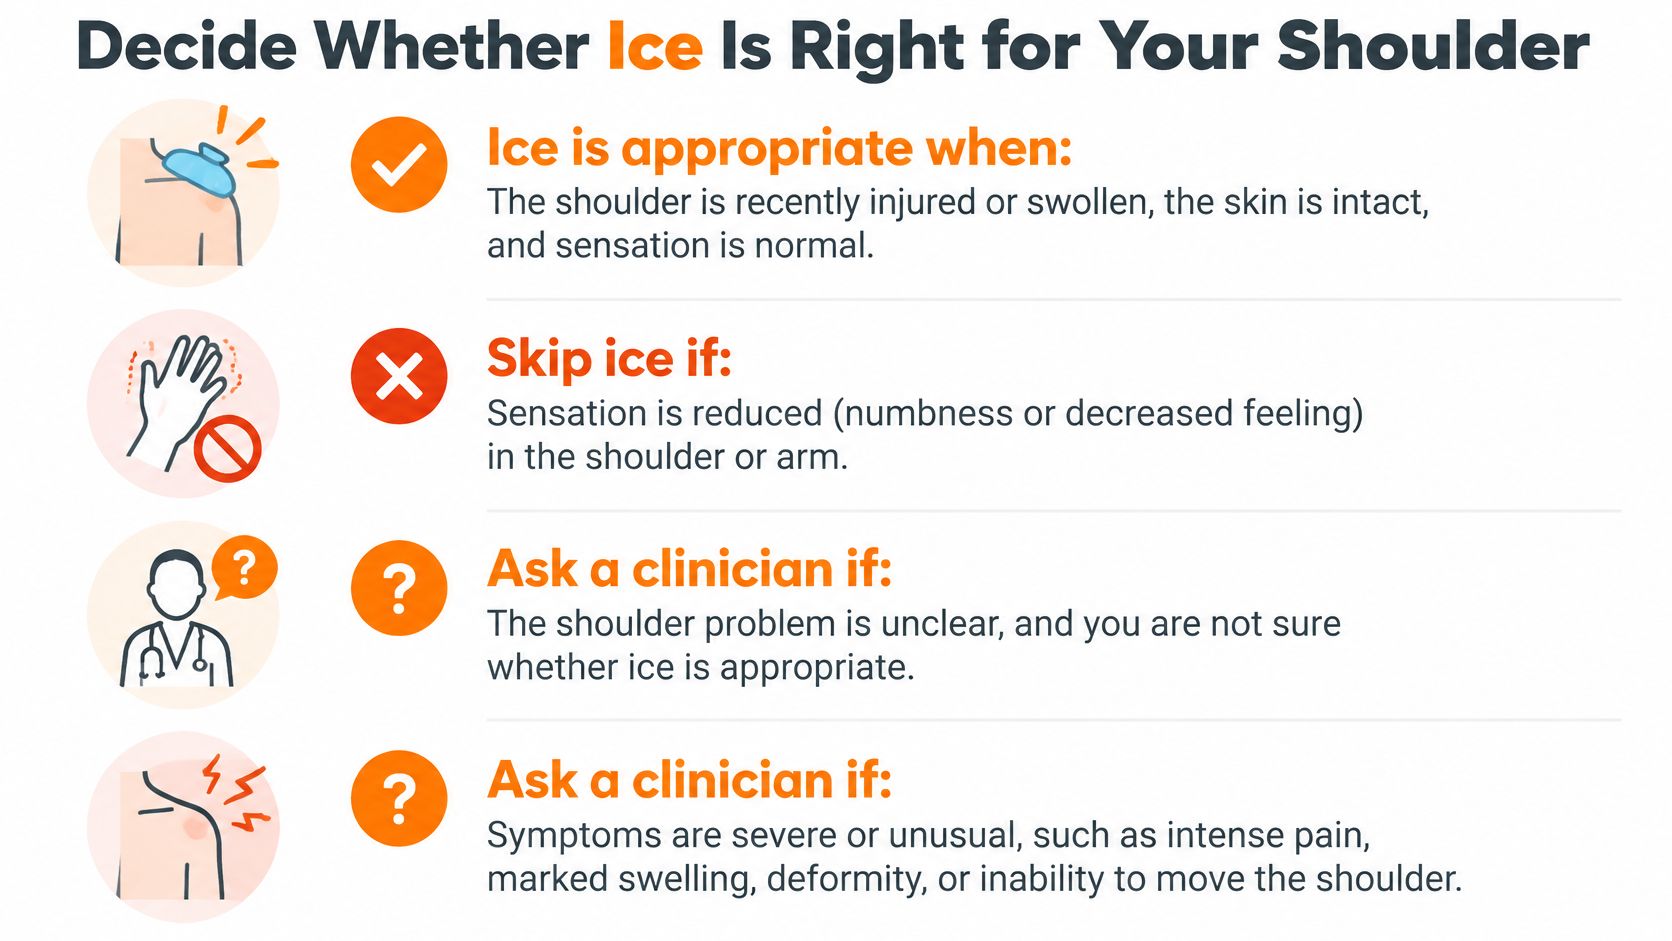
An NHS patient leaflet on soft-tissue injury of the shoulder recommends 10 to 15 minutes with a damp towel barrier, skin checks every five minutes, and immediate removal if skin becomes white, blue, blotchy, excessively painful, numb, or tingly. That leaflet also advises against icing areas with reduced sensation, poor circulation, or open wounds.
Who Should Ask a Clinician First
Ask first if any of these apply to you:
- Diabetes or neuropathy: you may not feel harmful cold quickly enough.
- Vascular disease or poor circulation: cooled tissue may rewarm slowly and unevenly.
- Cold hypersensitivity or Raynaud's phenomenon: cold itself can trigger a painful reaction.
- Open wounds or local infection: don't place a pack over broken skin.
- Postoperative numbness: numbness after surgery means your warning system isn't working normally.
- Difficulty inspecting the shoulder: if you can't see or reach the skin, you can't check it properly.
This isn't alarmist caution. Your skin's color and your ability to feel temperature are the feedback that keeps a short session safe. Without that feedback, you need a clinician to decide whether, where, and how long to apply cold.
Warning Signs and What to Do
| Warning sign | What it may mean | What to do |
|---|---|---|
| Skin turns white, blue or blotchy | Cold exposure is too intense or too long | Remove the pack at once and let the skin warm |
| Numbness or tingling during or after a session | Nerve sensation is reduced | Stop icing and seek clinician advice before reusing |
| Visible deformity or severe weakness | Possible structural injury | See a doctor promptly |
| Persistent numbness or escalating pain | Possible nerve, circulation or other problem | Arrange medical assessment |
Don't try to push through a color change because the timer hasn't finished. Remove the pack, let the skin warm naturally, and don't reapply until color and feeling are normal. Deformity, severe weakness, persistent numbness, or pain that keeps escalating needs medical assessment, not another session.
It also helps to separate a new swollen injury from long-standing stiffness. Chronic stiffness without swelling may respond better to heat, and sorting out overlapping diagnoses matters, which is why understanding frozen shoulder compared with rotator cuff problems can change what you do next.
If your shoulder passes these checks, place your barrier, set your timer, and proceed. A Large Ice Bag with Strap can be filled with ice or hot water for hot or cold therapy, so you can repeat the same checked routine without improvising a new setup each time.
Ice Packs, Cold Units and Other Cooling Options
The terms get mixed up, so separate them first. An ice pack is the frozen or chilled pack you place on your shoulder. Cold therapy is the broader category, and it includes gel packs, circulating-water wraps, and motorized units.
Shoulder Cooling Options Compared
| Option | Cooling source | Best for | Main limit |
|---|---|---|---|
| Conventional ice pack or bag | Ice or frozen gel | Short sessions for acute pain | Needs a damp cloth barrier |
| Cold gel pack | Freezer-cooled, can fall below 0°C | Flexible home use | Insulating layer required, never on bare skin |
| Circulating-water or cryo cuff system | Pumped cold water or cooled device | Post-surgery care under clinician direction | Harder to set up and less portable |
| Motorized cold-therapy unit | Powered cooling in a fixed wrap | Structured rehab schedules | Needs a fixed setup and a set daily routine |
A conventional shoulder ice pack is usually enough at home for acute pain. It's portable, you control each short session, and you can stop the moment your skin tells you to. The barrier isn't optional with any row in the table.
Gel packs deserve extra care because a pack taken straight from the freezer can fall below 0°C. That is colder than ice melting in a bag, and it's why an insulating layer is required every time. Flexible doesn't mean gentle, so don't let a soft pack fool you into skipping the cloth.
Circulating-water and cryo cuff systems appear more often after surgery, under clinician direction. In a summary by South Carolina Blues of a 2024 randomized controlled trial of 200 patients, standard postoperative care included ice packs for 30% of participants, while 43% used CryoCuff devices. Treat those figures as a snapshot of practice in that trial, not proof that one tool suits your shoulder.
Motorized units sit at the structured end. A 2025 PubMed-indexed study of a motorized cold-therapy unit instructed adult rotator-cuff-repair patients to use the device at least four times daily for 30-minute sessions for a minimum of two weeks. That's a prescribed rehab routine, not a model for casual home icing.
Match the tool to the setting, portable and short for home use, structured and supervised after surgery or during formal rehabilitation.
How to Apply a Shoulder Ice Pack Safely
One rule prevents most problems. A shoulder ice pack never touches bare skin.
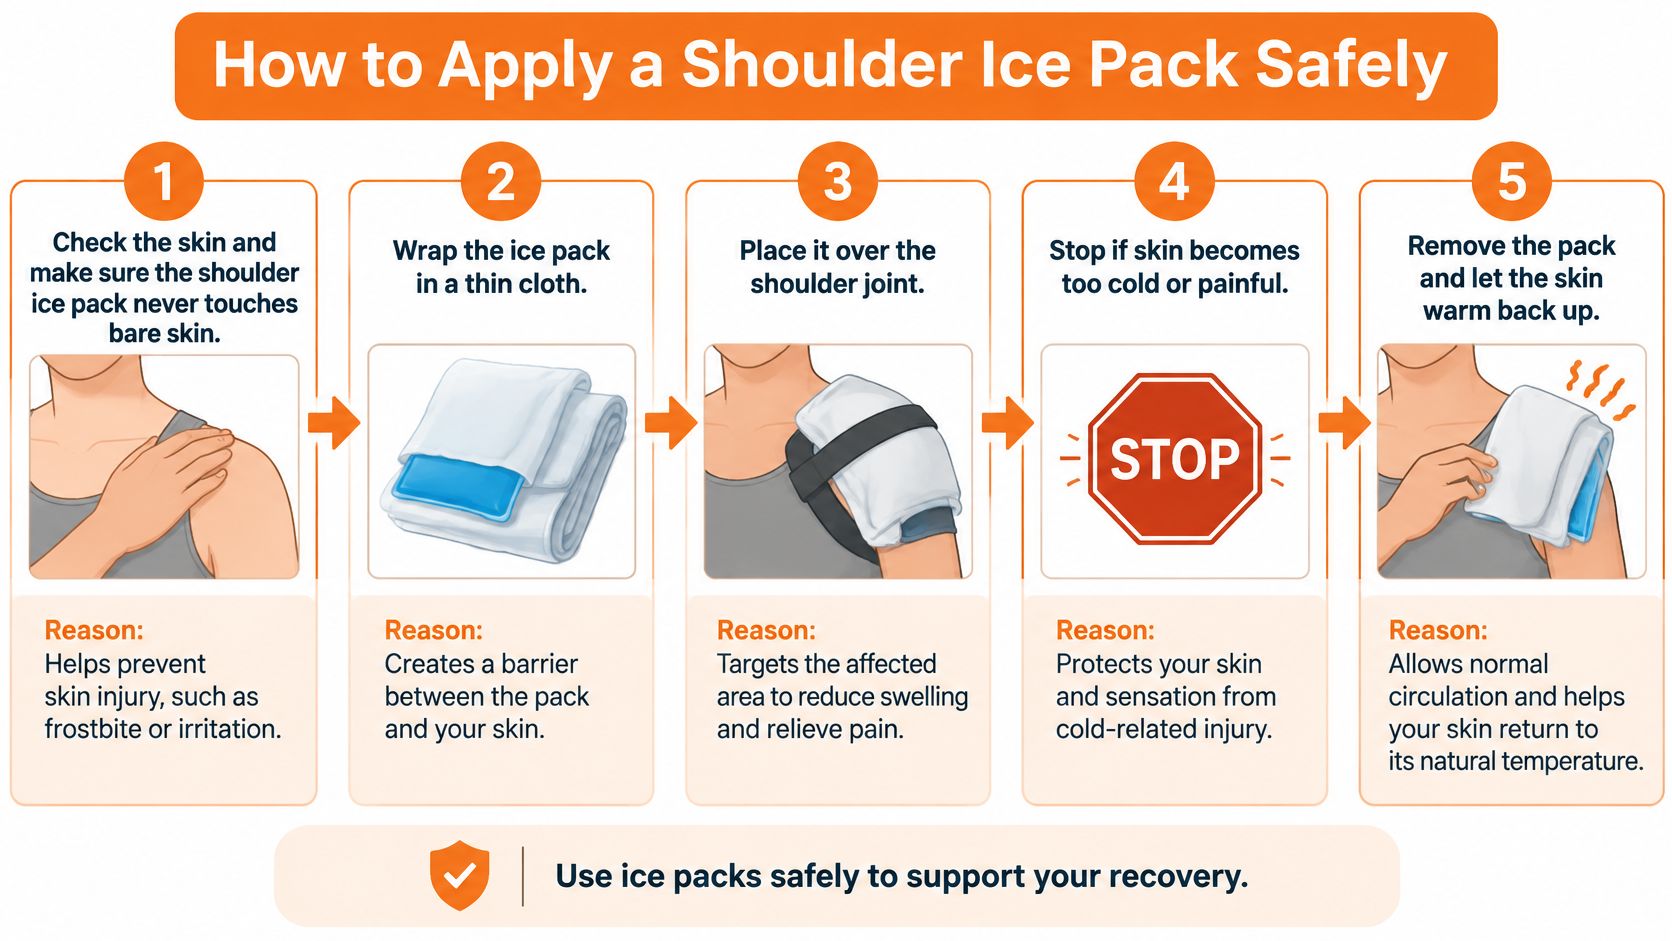
The Seven-Step Routine
- Check skin and sensation first. Look at the whole area where the pack will sit and confirm you can feel light touch and temperature normally. If there's numbness, poor circulation, or an open wound, stop here and get clinician advice instead of icing.
- Wrap the pack in a damp towel. Dampen the towel, wring it out, and fold it so there's an even layer with no bare patches. That cloth is your barrier, and it slows skin cooling while still letting cold reach the tissue underneath.
- Position it over the joint. Place the wrapped pack over the front or back of the shoulder joint, depending on where your pain and swelling sit. Shape it around the deltoid so it makes broad, even contact instead of pressing on one bony point.
- Set a timer for 15 to 20 minutes. Choose your session length before you get comfortable, using the shorter end if your skin chills fast. A visible timer stops a short rest from drifting into an unmonitored nap.
- Check your skin every five minutes. Lift an edge and look. Remove the pack at once if skin turns white, blue, or blotchy, or if the area feels numb, tingly, or more painful, as those signs mean the session has gone too far regardless of the clock.
- Remove the pack and rewarm. When the timer ends, take it off even if it still feels soothing. Let your skin return to its normal color and temperature before you consider another application, and move the shoulder gently once feeling is normal.
- Repeat within the daily limit. Repeat up to 3 to 5 times a day, with rewarming between sessions. Spacing matters because tissue that starts each session already cold reaches a risky temperature much faster.
What a Good Session Feels Like
You should feel clear, mild cold that gradually dulls the ache. Your skin may look slightly pink when you finish, then return to normal as it warms. You shouldn't feel burning, sharp pain, or complete numbness, and you shouldn't see pale or mottled patches.
Say you're icing after a strain and, at the first check, the skin looks normal but feels intensely cold. Add a layer or end the session, don't tough it out. Say it still looks normal at the second check and the ache feels quieter. That's the response you want, and you still stop at the timer.
If reaching the back of your shoulder to check is hard, use a mirror or ask someone to look for you. Learning the same barrier routine in our guide to using an ice bag for injuries can help you build a consistent setup. Never fall asleep with a pack strapped on, because sleep removes the checks that make the routine safe.
Choosing Fit, Straps and Cleaning for Reusable Packs
Fit decides whether cold reaches the sore tissue. A contoured shoulder ice pack should lie over the joint and the deltoid, curve from front to back, and stay in place without you pinning it with your other hand for the whole session.
Fit and Strap Choices
- Contoured shape: look for a flexible pack that bends around the shoulder instead of bridging across it, since gaps mean uneven cooling.
- Adjustable straps: choose straps that hold the pack secure but not tight, because compression you didn't intend can add pressure to already irritated tissue.
- Hands-free wear: a strap design frees your other arm for light tasks, but you still need to sit or stand where you can check your skin.
- Wide opening: on a fillable bag, a wide opening makes adding ice easier and reduces spills when your shoulder is sore.
- Removable cover: a washable cover gives you a built-in barrier layer and makes hygiene simpler between sessions.
Test fit before you freeze the pack solid. Put it on over your barrier cloth, fasten the strap, and move your arm slightly. If it slides to your neck, digs into the top of your arm, or only touches the point of your shoulder, adjust or choose a different shape.
A Simple Cleaning Routine
- After each use: wipe the outer cover so dampness and skin oils don't sit on the fabric.
- After several uses: wash a removable cover according to its label, rather than guessing at temperature or detergent.
- Before refreezing: dry the cover and pack fully, so fabric doesn't freeze stiff or develop a stale smell.
- Every few sessions: inspect seams and surfaces for cracks, thinning, or leaks, especially at fold points.
- For storage: store the pack flat in the freezer so it freezes in a shape that will sit comfortably on your shoulder.
Replace a pack that leaks, cracks, or smells sour even after cleaning. A damaged reusable pack doesn't just make a mess. It can put gel or icy water directly against the barrier and change how predictable the cold feels against your skin.
Timing Ice Around Exercise and When Heat Works Better
Cold creates a trade-off that surprises many active people. It can ease pain, but it can also temporarily blunt the feedback your shoulder needs to move accurately.
In a controlled study indexed by PubMed on crushed ice applied to the shoulder, 15 minutes of crushed-ice application negatively affected muscle strength and impaired proprioception, including joint-position sense and detection of passive movement, compared with a skin-temperature sandbag. Reduced tissue temperature can slow nerve conduction, so your shoulder may not judge its own position as well right after icing.
Ice After Movement, Not Before
Apply a shoulder ice pack after exercise or therapeutic movement. Don't ice immediately before throwing, resistance training, balance-demanding tasks, or exercises that require accurate shoulder positioning. After a session, let the shoulder rewarm, then check that sensation feels normal and easy movements feel controlled before you attempt demanding work.
Scheduling is part of broader recovery habits, too. Following structured rotator cuff recovery guidance helps you place cold after the right exercises, and paying attention to sleep, activity, and circulation, much like the general lifestyle changes for erectile health that emphasize blood flow and daily habits, supports the work a single pack can't do alone.
A Quick Cold or Heat Test
Ask two questions before you choose. Is the shoulder newly sore, hot, or puffy after a strain or workout? Start with cold. Is it stiff and achy without swelling, the kind of shoulder that loosens once you move around? Warmth may suit it better.
Cold calms a fresh, swollen flare. Heat loosens a stiff shoulder that isn't swollen.
If stiffness persists, or you keep guessing between the two week after week, ask a clinician to examine the shoulder. The decision for most training days is simpler, finish your workout or rehab session first, then ice.
Why Cold Works and What the Evidence Shows
Say you spend Saturday carrying boxes up a flight of stairs. By evening your shoulder is sore, a little warm, and puffy around the joint, so you place a wrapped shoulder ice pack over it and set a timer.
The diagram below shows where that cold is meant to act on a strained shoulder.
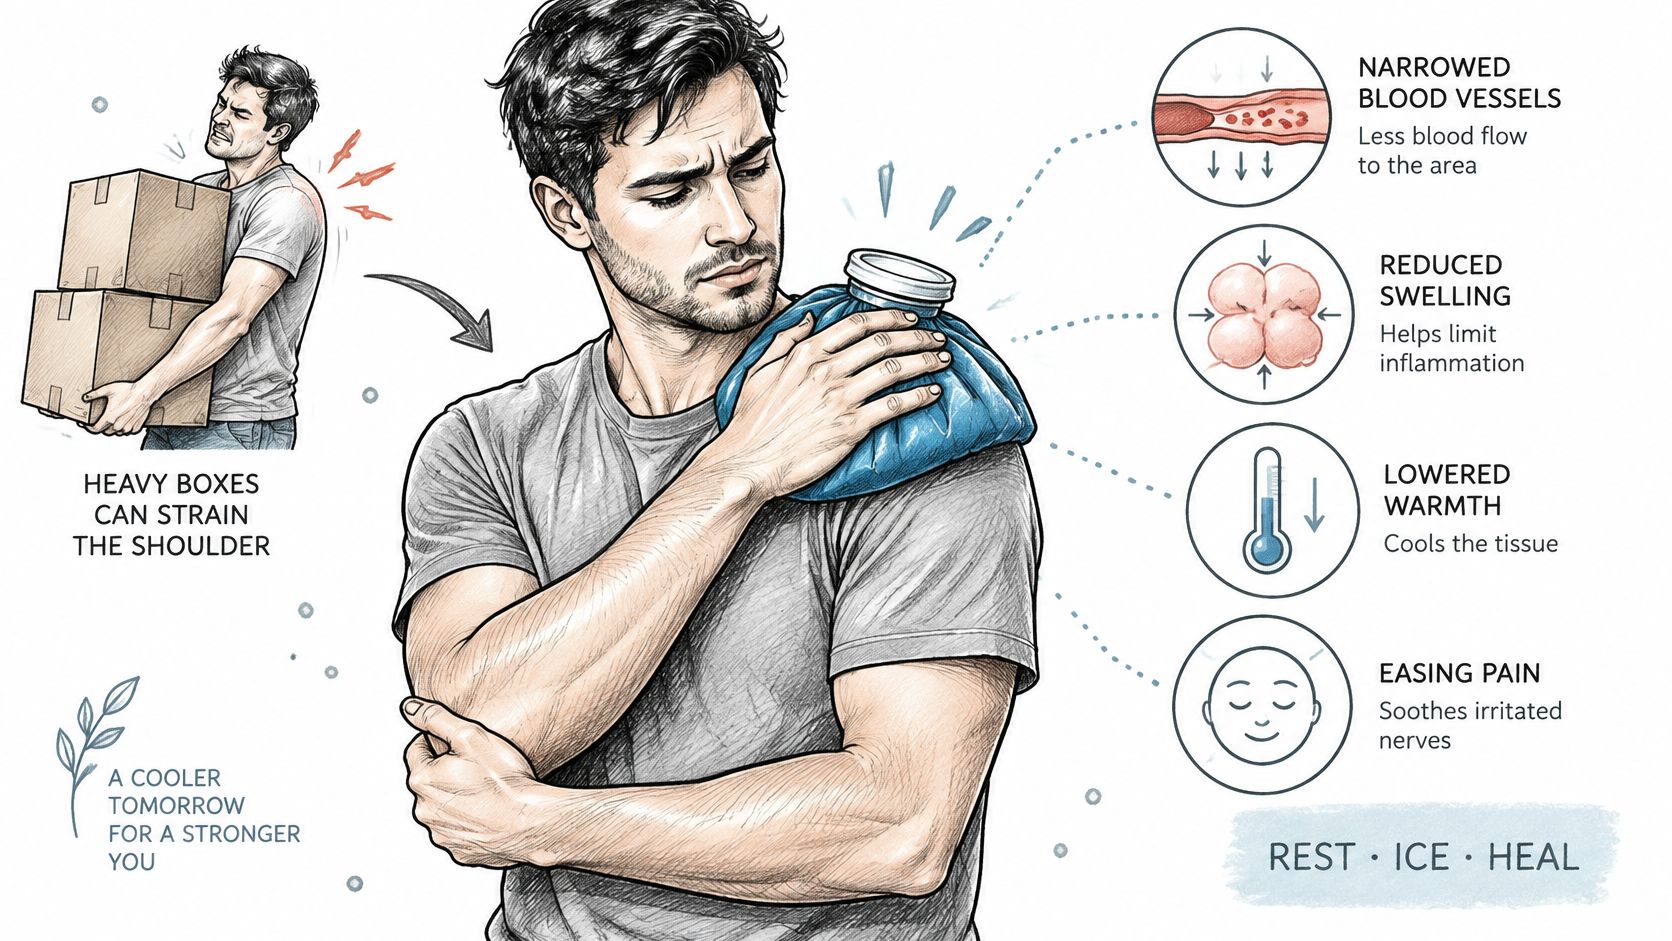
What Cold Does in the Tissue
Cold narrows blood vessels near the surface. With less blood flowing into the area, swelling and warmth build more slowly. At the same time, reduced sensory nerve activity dulls the pain signal traveling from the tissue, so the shoulder feels quieter while the pack is on and for a while afterward.
Think of cold as turning down the volume on an overactive alarm. The alarm still exists, and the condition that triggered it still needs attention. A pack doesn't repair a torn tendon, reposition a joint, or treat the underlying cause. It gives you a calmer window in which to rest, move gently, or do prescribed rehabilitation.
That distinction matters when pain keeps returning. Repeatedly numbing a shoulder so you can push through the same aggravating activity isn't recovery, and readers considering tendon problems may benefit from evidence-based care for tendon injuries alongside a clinician's assessment of load and technique.
What the Trials Actually Found
Most clinical evidence for shoulder cooling comes from postoperative care, not everyday soreness. A 2024 systematic review in PMC of six randomized clinical trials covered 233 patients who underwent different shoulder surgeries. Across those trials, 110 patients received cryotherapy, 93 served as untreated controls, 5 received placebo treatment, and 25 received another comparison, such as warm water or a subacromial anesthetic injection.
The cooling methods weren't one identical product. They included conventional ice packs as well as circulating-water and commercial cryotherapy systems. Overall, cryotherapy generally reduced postoperative shoulder pain, although at least one included study found no statistically significant difference from control treatment.
Read that result in proportion. The trials averaged fewer than 40 participants each, so they're relatively small. Cooling looks like a useful adjunct for short-term pain management after shoulder surgery, but it isn't consistently superior to standard care or other treatments, and you shouldn't stretch surgical findings to every case of shoulder soreness.
The video below gives a visual walkthrough of applying cold to the shoulder, which can help you connect the mechanism to placement.
A Short History of a Familiar Habit
People used cold empirically for centuries, but formal medical recommendation came much later. A historical review of cryotherapy in the European Journal of Applied Physiology reports that therapeutic ice application for musculoskeletal injury was not recommended until the 1960s, citing publications by Grant and Hayden in 1964. Shoulder-specific research was documented by 1974, when Benson and Copp examined the effects of therapeutic heat and ice on pain thresholds in the normal shoulder.
Later randomized trials in the 2024 review dated from 1996 through 2020 and assessed continuous cryotherapy, ice packs, and commercial cooling devices. That progression, from habit to controlled study, also explains the caution in modern guidance. Reviews still report inconsistent outcomes for pain, swelling, and medication use, so a measured claim serves you better than a sweeping one.
Your practical takeaway is this. Cold can provide temporary relief of pain and swelling and support rehabilitation and clinician-directed care, especially after a procedure or acute soft-tissue irritation. It doesn't replace diagnosis, it doesn't heal damaged tissue by itself, and colder or longer doesn't make it more therapeutic. Use the pack as one checked, timed tool in a larger plan for getting your shoulder moving safely again.
When you're ready to build a safe, repeatable routine, we at SunnyBay offer reusable hot and cold options, including a strapped ice bag you can secure over the shoulder for timed sessions. Browse the range, choose a contoured design you can fit and clean easily, and visit SunnyBay to find the right support for your next session.


