


How to Treat Muscle Strain for a Faster Recovery
-
You feel it happen—that sudden, sharp twinge that tells you you’ve pushed a muscle too far. What you do in the next few moments, and over the next three days, can make all the difference between a quick recovery and a nagging injury.
The key is to follow the P.O.L.I.C.E. principle: Protection, Optimal Loading, Ice, Compression, and Elevation. This isn't just a catchy acronym; it's a modern, evidence-backed approach that prioritizes smart, gentle movement over complete bed rest to get you healing faster and more effectively.
Your First 72 Hours After a Muscle Strain
Think of that initial pull as your body’s fire alarm. Ignoring it is like letting the fire spread. Those first 72 hours are your window to control inflammation, manage pain, and lay the groundwork for a solid recovery.
Many of us grew up hearing about R.I.C.E. (Rest, Ice, Compression, Elevation), but the thinking has evolved. We now know that complete rest isn't always best. The P.O.L.I.C.E. method adds two crucial updates: Protection and Optimal Loading.
This isn't just a minor tweak. It represents a fundamental shift from keeping a muscle completely still to moving it intelligently. Muscle strains are incredibly common—they affect over 65 million people in the U.S. annually and are a top reason people have to take a break from their activities. In fact, musculoskeletal conditions are a leading cause of disability worldwide, impacting a staggering 1.71 billion people. You can learn more from these muscle pain trends and statistics.
The table below breaks down exactly what you should be doing during this critical initial phase.
Your First 72 Hours: A Muscle Strain Action Plan
Follow the P.O.L.I.C.E. protocol for effective first aid and to kickstart your recovery in the critical initial phase.
| Timeframe | Action (P.O.L.I.C.E.) | Goal & Rationale |
|---|---|---|
| Immediately | Protection | Stop the activity. Use crutches for a bad leg strain or a sling for an arm to prevent making the injury worse. |
| Day 1 | Optimal Loading & Ice | Begin gentle, pain-free movements (like ankle circles for a calf strain). Apply ice for 15-20 minutes every few hours. This promotes blood flow for healing while the ice manages swelling. |
| Day 2 | Ice, Compression, Elevation | Continue icing. Use an elastic bandage for compression and keep the injured area elevated above your heart whenever possible to reduce fluid buildup and swelling. |
| Day 3 | Optimal Loading & Ice | Gradually increase the range of pain-free motion. Continue icing as needed for pain and swelling, which should be noticeably decreasing by now. |
This structured approach helps manage the initial trauma so your body can shift into repair mode efficiently.
The Modern P.O.L.I.C.E. Protocol
Let's break down why this method works so well. Instead of letting a muscle get stiff and weak from total inactivity, P.O.L.I.C.E. encourages you to be an active participant in your healing from day one.
-
Protection: This is about common sense. You need to shield the injured muscle from further damage. If you’ve pulled a hamstring, that might mean using crutches for a day or two. For a shoulder strain, you'd avoid lifting anything heavy. It's not about immobilization; it’s about preventing a setback.
-
Optimal Loading: This is the real game-changer. It means introducing light, pain-free movement to the muscle. Think of it as gently reminding the muscle of its job. For a calf strain, this could be slow, careful ankle rotations. This subtle activity helps stimulate blood flow and kickstarts the repair process without re-tearing delicate fibers. It's all about finding that sweet spot between doing too much and not doing enough.
This simple flowchart walks you through each step visually.

As you can see, every component has a specific job. They work together to create the perfect environment for your body to get to work on repairs.
Getting Ice, Compression, and Elevation Right
The last three parts of the P.O.L.I.C.E. principle are the classic go-tos for a reason—they are highly effective for managing that initial acute phase. Doing them correctly will make a huge difference in your comfort and recovery timeline.
Ice is your absolute best friend for the first 48-72 hours. A cold pack constricts blood vessels, which is exactly what you want to do to calm down swelling and numb the throbbing pain of a fresh injury.
Crucial Tip: Never put ice directly on your skin—that’s a shortcut to frostbite. Wrap your cold pack in a light towel and leave it on for 15-20 minutes at a time. Give your skin at least a 30-minute break between sessions to recover.
Compression simply means wrapping the injured area with an elastic bandage. This adds gentle pressure that prevents fluid from pooling in the tissue, keeping swelling to a minimum. The wrap should feel snug, but if you notice any numbness, tingling, or the pain gets worse, it’s definitely too tight.
Finally, Elevation is all about using gravity to your advantage. Prop the injured limb up so it's higher than your heart. This helps drain excess fluid away from the injury and back toward the center of your body, which is another powerful way to reduce swelling. Strained your ankle? Kick your feet up on a few pillows while you’re on the couch. It’s that simple.
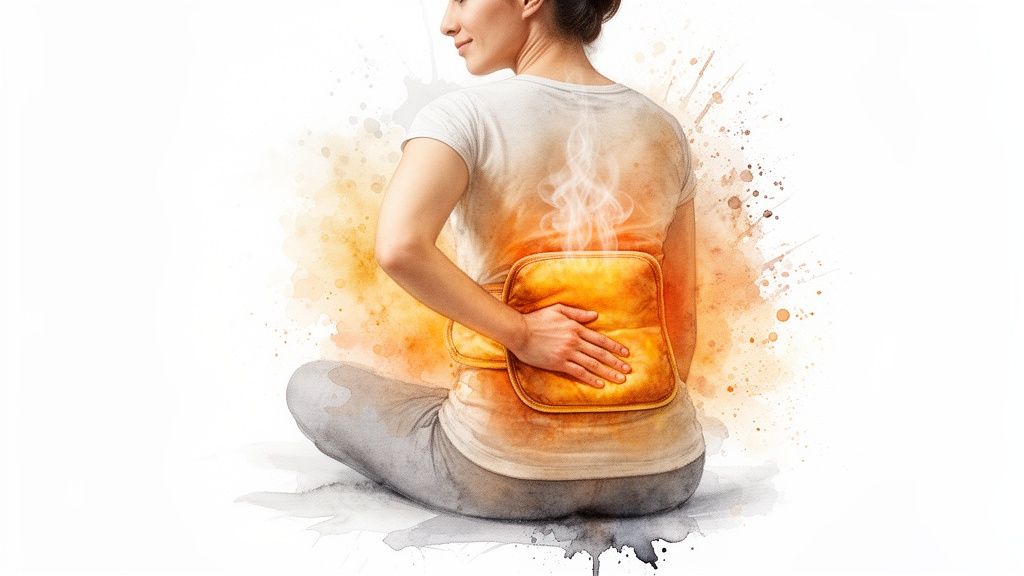
Using Heat Therapy to Accelerate Healing
Alright, so you’ve made it through the first 72 hours. You’ve been diligent with the ice packs, and the initial sharp pain and swelling have started to calm down. Now, it’s time to pivot. We’re going to switch gears from cold to warm, and this is where the real healing magic begins to happen.
Bringing heat into the picture isn’t just about comfort—though it certainly feels good. It's a strategic move to kickstart your body's natural repair process. Think of it this way: applying warmth to the injured area opens up the blood vessels, a process called vasodilation. This creates a superhighway for fresh, oxygen-rich blood to flood the strained muscle, delivering the nutrients it desperately needs to rebuild. At the same time, this increased circulation acts like a clean-up crew, flushing out all the metabolic waste that built up during the initial inflammation.
The effect is tangible. You'll feel the tight, guarded muscle fibers begin to relax and let go. That deep, achy stiffness starts to melt away, which means less pain and a noticeable improvement in your range of motion. This is exactly what you need to start easing back into gentle movement.
The Power of Moist Heat for Deep Relief
When it comes to heat therapy, not all heat is created equal. I've seen countless patients get some relief from a standard dry electric heating pad, but for muscle injuries, moist heat is almost always the superior choice. It just gets in there deeper.
Moist heat has a unique ability to penetrate far below the skin's surface, delivering therapeutic warmth right to the core of the muscle tissue more effectively.
Let's say you strained your lower back moving a piece of furniture. The muscles are probably locked in a painful spasm, and even standing up straight feels like a monumental task. Applying a moist heat pack, like a flax-filled wrap from SunnyBay, for just 15-20 minutes can feel like a total game-changer.
Here's a quick breakdown of why it's so effective:
- Deeper Penetration: Water is a better conductor of heat than air, which means the warmth can reach those deep, knotted-up muscle layers.
- Increased Tissue Elasticity: The moisture helps make your muscles and connective tissues more pliable and less stiff, prepping them for the gentle stretches that are crucial for recovery.
- Enhanced Comfort: Frankly, most people find the sensation of moist heat to be far more soothing than the sometimes-prickly, surface-level heat from a dry pad.
A classic example I see all the time is someone waking up with a stiff, strained neck. You know the feeling—you can barely turn your head without a jolt of pain. A dry pad might warm the skin, but a microwavable moist heat wrap that drapes over your neck and shoulders delivers a deep, sustained warmth that can release that tension and restore your mobility so much faster.
How and When to Apply Heat Safely
Once you’re safely past that 72-hour acute phase, you can start weaving heat therapy into your daily routine. But doing it right is key to getting the benefits without risking skin irritation or burns.
Here are a few practical rules of thumb I always give my clients:
- Time It Right: Stick to sessions of 15 to 20 minutes. Going longer doesn’t add more benefit and actually increases the risk of a burn.
- Create a Barrier: Never put a heat source directly on your bare skin. Always use a thin towel or a layer of clothing in between, especially with microwavable packs that can develop hot spots.
- Listen to Your Body: It should feel comfortably warm and soothing, never painfully hot. If you feel any discomfort or stinging, take it off immediately.
By understanding the basics of heat therapy, you can confidently use this simple, powerful tool to speed up your recovery. It’s all about helping your body transition from damage control to active, productive healing so you can get back to your life.
Rebuilding Strength: A Smart, Phased Approach
You’ve managed the initial pain and used heat to soothe the stiffness. Now what? The road to a full recovery isn't a sprint. One of the biggest mistakes I see people make is jumping back into their normal routine too quickly. That’s a surefire way to re-injure the muscle, often making it worse than the first time.
If you want to treat a muscle strain for good, a smart, structured return to activity is non-negotiable. This isn't about just waiting it out; it's about actively and intelligently rebuilding that muscle. Let's walk through a proven, three-phase plan to restore function, rebuild strength, and get you back to your life with confidence.
Phase 1: Gentle, Early Mobility
This first phase of active recovery can begin once the sharp, initial pain has faded, which is usually after the first 72 hours. The goal here is simple: restore your pain-free range of motion. You are not trying to build strength yet—you're just gently reminding the muscle how to move.
For this phase, think small and controlled. Pain is your body's signal to stop, and you need to listen to it.
Here’s what this looks like in practice:
- Strained Shoulder: Try slow, gentle pendulum swings. Lean forward, let your arm hang loose, and use your body to create a small, circular motion. This moves the joint without actually engaging the strained muscle.
- Pulled Hamstring: Lie on your back and slowly slide your heel toward your butt, bending the knee. Only go as far as you can without discomfort, then slide it back down.
- Calf Strain: While you're sitting, gently trace the alphabet in the air with your big toe. This encourages ankle mobility in all different directions.
These little movements might feel like you're not doing much, but they are crucial. They keep the muscle from getting stiff and prevent scar tissue from forming in a way that could limit your flexibility down the line.
Phase 2: Building Foundational Strength
Once you can move the injured area through its full range of motion without any pain, it's time to add a little bit of light resistance. This phase is all about safely building back the muscle’s endurance and basic strength. You’re starting to ask it to do some work again.
The key is to start light and progress slowly. Resistance bands are perfect for this stage because they provide consistent tension without the jarring impact you might get from heavy weights.
Let’s apply this to a couple of common injuries:
- Hamstring Strain: Start with hamstring curls using a light resistance band. Anchor one end to a door, loop the other around your ankle, and slowly pull your heel toward you against the tension.
- Groin Pull: A band is great for gentle adduction. Stand with the band looped around the ankle of your injured leg and anchored to the side. Gently pull your leg inward, crossing it in front of your body.
Recovery Insight: This phase is a test of patience. You’ll have good days where you feel tempted to push harder, but consistency is far more important than intensity right now. Rushing this stage is the number one reason people have setbacks.
As you start rebuilding, don't forget that your muscles need the right fuel. It's worth understanding what foods help muscle recovery to support the healing process from the inside out.
Phase 3: Returning to Full Activity
This final phase is the bridge back to your normal life, whether that means playing sports, going to the gym, or just doing daily chores without a second thought. Here, you'll start doing functional movements that mimic the activities you want to get back to, gradually increasing the intensity, speed, and complexity.
You're shifting from simple, isolated exercises to compound movements that reflect real-world actions.
- For a runner with a calf strain: This looks like progressing from a brisk walk to a light jog on a soft surface, like a track or grass. From there, you'd slowly increase your duration and speed over several weeks.
- For a weightlifter with a bicep strain: You would start with very light bicep curls using dumbbells, focusing on perfect form. You'd only increase the weight slowly, making sure there's absolutely no pain.
There's a reason the muscle pain treatment market is on track to hit $16.66 billion by 2029—people are actively looking for effective, non-drug solutions. Heat therapy is central to this, as studies show that applying heat can increase tissue elasticity by 10-20%, which can seriously help cut down on re-injury rates.
To get the most out of this, experts often suggest using a quality heat pack, like SunnyBay's U.S.-made products, for a 15-20 minute session to properly warm up the muscle before you start these return-to-activity exercises.
You can find more guidance on our blog throughout your recovery. For a deeper dive, check out our guide on how to speed up muscle recovery for more expert tips. Ultimately, listening to your body and following a phased approach is the most reliable way to heal completely and come back stronger.
How Massage Can Speed Up Your Recovery
When you're dealing with a muscle strain, don't just think of massage as a luxury. It's a critical part of the healing process. Imagine your body trying to mend a torn muscle. It lays down new fibers, but this scar tissue can be rigid and disorganized, leading to stiffness and making you prone to reinjury. A targeted massage helps break down this stiff scar tissue, align the new fibers correctly, and restore flexibility.
The benefits are undeniable. Massage therapy dramatically boosts circulation, which is like opening a fast lane for healing. It rushes nutrient-rich blood to the area to repair tissue and efficiently clears out inflammatory waste products that cause pain and swelling. The result is faster healing, reduced soreness, and a quicker return to pain-free movement.
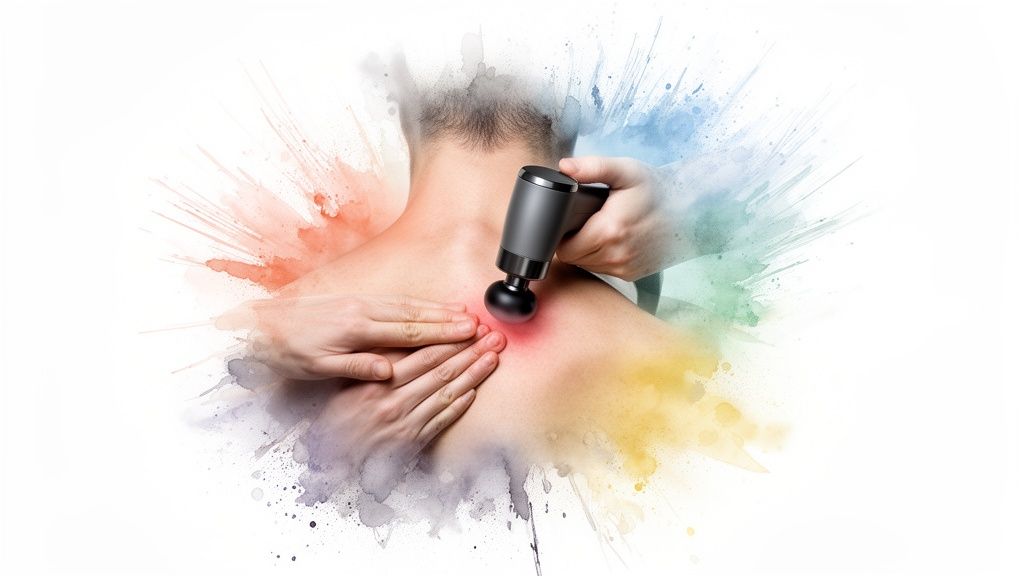
Honestly, this kind of hands-on approach offers a level of relief that heat or stretching just can't touch, especially when you're up against those deep, stubborn knots.
Practical Massage Techniques for Strains
The good news is you don't need a professional license to get started. A combination of professional sessions and at-home self-massage can work wonders. You just need to match the right technique to where you are in your recovery.
-
Broad, Gentle Strokes: Once you’re past the first 72 hours of the injury, start with broad, gliding strokes using your open palm. This is known as effleurage, and it’s perfect for warming up the muscle and boosting circulation without aggravating the sensitive area. It feels great on a strained quad or calf.
-
Focused, Deeper Pressure: As the initial tenderness fades, you can start using your thumbs, knuckles, or a massage tool to target specific knots. This is where you’ll find those pesky trigger points—tiny, irritable spots that can send pain shooting to other parts of your body.
Think about that nagging knot between your shoulder blades after a long day at the computer. Gently pressing on that one spot for 30-60 seconds can release tension you've been holding onto for hours, instantly improving your range of motion.
Integrating Self-Massage at Home
Doing your own massage work at home is a fantastic way to stay on top of your recovery. A few simple tools can make all the difference.
A foam roller works wonders on big muscle groups like your hamstrings or back. For smaller spots like your glutes or shoulders, a lacrosse ball is your best friend. And if you have one, a massage gun provides a deep, percussive massage that can really break up tight spots and stimulate blood flow.
Pro Tip: For a truly effective session, combine massage with heat. Place a warm pack on the area for about 15 minutes before you start. The heat relaxes the muscle fibers, making them much easier to work on. This one-two punch is a game-changer for getting rid of stiffness and speeding up recovery.
For a comprehensive approach, a session like a relaxing Thai massage from a professional can be incredibly effective. If you’re dealing with really persistent knots, it's worth learning about trigger point therapy, a technique designed specifically to release these tension spots. Whether you see a pro or work on it at home, this hands-on approach is vital for getting your muscle back in working order.
When You Should See a Doctor
Most of the time, you can handle a muscle strain right at home. You've got the roadmap now: deal with the initial injury, know when to switch from cold to heat, ease back into movement, and even use massage to help things along. But even the most solid self-care plan has its limits. A huge part of safely treating a muscle strain is knowing when to call it and get a professional opinion.
The thing is, sometimes what feels like a simple strain is actually something more serious. Certain symptoms can point to a complete muscle tear (a Grade 3 strain) or even a hidden fracture. If you ignore these signs, you risk turning a temporary setback into a long-term problem. So, let's talk about the red flags that mean it's time to pick up the phone.
Obvious Red Flags You Cannot Ignore
Some signs are your body's way of screaming for help. If you experience any of these, don't just wait it out. It's time to see a doctor, and soon.
- You heard a "pop" sound: A sudden, distinct popping or snapping noise when the injury happened is a classic sign of a severe tear in the muscle or tendon.
- You can't bear weight: If you literally can't put any weight on the injured leg, ankle, or foot, that's a signal of a major injury.
- There's a visible deformity: Take a look at the area. Do you see any unusual lumps, gaps, or indentations that definitely weren't there before? That, along with significant and immediate swelling, is a big warning sign.
- You're in severe pain: We expect some pain with a strain, but we're talking about intense, non-stop pain here. If basic home care isn't even touching it, something more is going on.
These symptoms are way beyond a typical pull. You'll need a proper diagnosis, which might involve an MRI or other imaging, to figure out the right treatment plan.
More Subtle Signs It Is Time for a Doctor
Not every warning sign is a five-alarm fire. Sometimes, the clues are a bit quieter but no less important. It's easy to dismiss these, but they can also point to a problem that needs a doctor's eye.
It's worth remembering how common these injuries are. Back pain from muscle strains alone is a massive issue, affecting over 570 million people globally and standing as a leading cause of disability. The World Health Organization is even pushing for better guidance on musculoskeletal health through its Rehabilitation 2030 initiative because knowing when self-care isn't cutting it is so critical. Find out more about global musculoskeletal health trends.
Don't fall into the "tough it out" trap. Pushing through the wrong kind of pain is how a manageable injury morphs into a chronic, nagging problem. The smartest thing you can do for your body is to actually listen to it.
Keep an eye out for these lingering issues:
- Numbness or tingling: Any pins-and-needles sensation, tingling, or outright numbness around the injury could mean a nerve is involved. That needs to be checked out.
- No improvement after a week: You've been doing everything right—resting, icing, and starting gentle heat—but after a full week, you feel no different. Or worse. Your pain should be slowly getting better, not staying stuck at the same level.
- Signs of infection: This is a different kind of red flag. Look for spreading redness or red streaks, skin that feels hot to the touch, or if you start running a fever.
When in doubt, play it safe. Getting a professional opinion is always the right call. A doctor can give you a clear diagnosis and a recovery plan built just for you, ensuring you get back to your life without any lasting complications.
Common Questions About Treating Muscle Strains
When you're dealing with a pulled muscle, it's natural to have questions. Getting the right answers can mean the difference between a smooth recovery and frustrating setbacks. Let’s tackle some of the most common things people ask when they're on the mend.
How Long Does a Pulled Muscle Take to Heal?
This is the big one, and the honest answer is: it completely depends on how bad the strain is. I usually break it down into three general timelines:
- Grade 1 (Mild Strain): This is your typical over-exertion injury. With good home care, you should feel mostly back to normal within one to three weeks.
- Grade 2 (Moderate Strain): There’s a partial tear here, so you’ll need to be more patient. Expect a recovery window of about three to six weeks.
- Grade 3 (Severe Rupture): A complete tear is a serious injury. Healing can take several months, and you'll almost certainly need professional medical guidance.
The key to staying on the shorter end of these estimates is following the right steps—from that initial P.O.L.I.C.E. protocol to transitioning to heat therapy and slowly reintroducing movement.
The most important factor? Consistency. Skipping a few days of gentle movement or forgetting to apply heat can stretch out your recovery time. Sticking to a daily routine makes a significant difference.
Should I Take Pain Relievers Like Ibuprofen?
Over-the-counter NSAIDs (non-steroidal anti-inflammatory drugs) like ibuprofen can definitely help take the edge off the pain and swelling in the first couple of days. But it’s a bit of a trade-off. Some research suggests that by tamping down inflammation, these pills might also quiet some of the body's natural healing signals.
Because of this, it's probably best to use them for short-term relief only when the pain is really getting to you. Relying on drug-free methods like a smart rotation of cold and heat therapy is a fantastic way to manage discomfort throughout the entire process. And of course, always have a quick chat with your doctor before starting any new medication.
Is It Safe to Stretch a Pulled Muscle Immediately?
Let me be very clear on this: do not stretch a fresh muscle injury. For the first 48-72 hours, those muscle fibers are frayed and incredibly vulnerable. Trying to force a stretch can easily make the tear worse, ramp up the inflammation, and put you right back at square one.
Instead, your focus should be on protection and very gentle, pain-free motion—that "optimal loading" we talked about earlier. Once that initial, sharp pain fades, you can start introducing some slow, light stretches. The golden rule here is to stop the second you feel anything sharp. Save the deeper, more intense stretching for when you're much further down the road to recovery.
What Is the Best Way to Prevent Future Muscle Strains?
Prevention is always the best medicine. Once you’re healed, the goal is to make sure you don't end up here again. It really comes down to building a few solid habits:
- Always Warm-Up and Cool-Down: A dynamic warm-up (think leg swings, arm circles) gets blood flowing and prepares muscles for work. Afterward, a cool-down with some static stretching helps restore flexibility.
- Focus on Balanced Strength: Regular strength training prevents imbalances where one muscle group has to overcompensate for another, a classic recipe for a strain.
- Hydrate and Eat Well: Your muscles are made of tissue that needs water and nutrients to perform and repair. Dehydration is a huge contributor to muscle injuries.
- Listen to Your Body: This might be the most crucial tip of all. Learn the difference between the satisfying burn of effort and the sharp alarm bell of pain. Never push through real pain.
Here's a pro tip: use a heat pack on chronically tight spots before you work out. For example, if your lower back always feels stiff, applying a moist heat wrap for 15 minutes beforehand can make that tissue more pliable and far less likely to strain. It’s a simple step that primes your muscles for activity and dramatically lowers your risk.
At SunnyBay, we believe in the power of simple, effective, drug-free relief. Our U.S.-made microwavable heat packs are designed to provide deep, soothing warmth to relax tight muscles, ease pain, and accelerate your recovery. Discover the right solution for your needs and get back to doing what you love.