


A Practical Guide on How to Treat Bursitis at Home
-
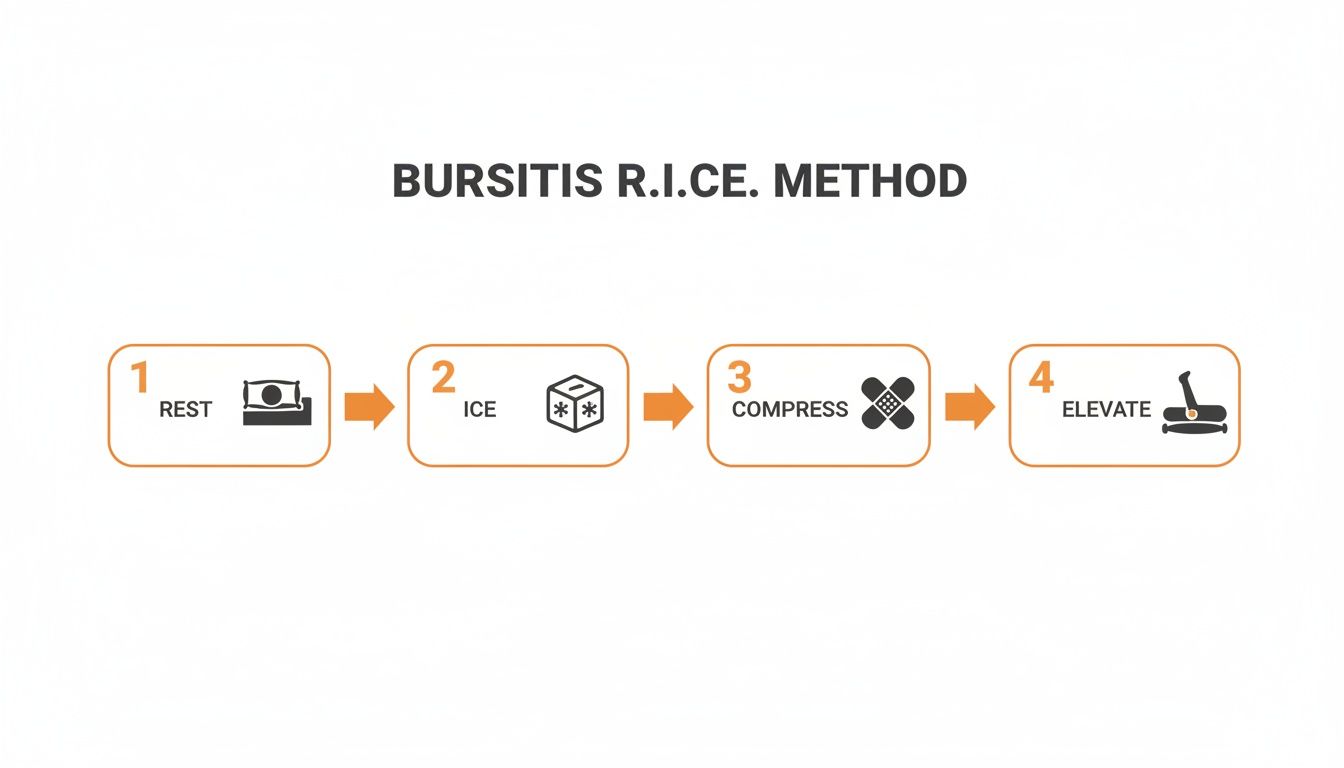
When that familiar, nagging bursitis pain flares up in your shoulder, hip, or knee, your immediate game plan should be the R.I.C.E. method. This simple acronym stands for Rest, Ice, Compression, and Elevation, and it's your best defense for managing that initial, intense inflammation in the first 24-48 hours.
Your Immediate Action Plan for Bursitis Pain
That sharp, aching pain from a swollen bursa is your body's alarm bell. Trying to "tough it out" or push through the discomfort is one of the biggest mistakes people make—it almost always makes the inflammation worse and drags out your recovery time. The goal for the first couple of days is simple: calm everything down.
This is where the R.I.C.E. protocol becomes so important. It isn't just a random list; each part plays a specific role in tackling a bursitis flare-up right when it starts.
Mastering the R.I.C.E. Method
Think of R.I.C.E. as a complete first-aid system for your joint.
- Rest: This is non-negotiable. Stop doing whatever triggered the pain. If a long day of gardening set off your shoulder, the rake and shovel need to be put away for a few days. You have to give that irritated bursa a break.
- Ice: Grab a cold pack or even a bag of frozen peas, wrap it in a thin towel (never apply ice directly to the skin!), and place it on the sore spot for 15-20 minutes at a time, every few hours. The cold is fantastic for numbing the pain and, more importantly, constricting blood vessels to reduce swelling.
- Compression: Gently wrapping the joint with an elastic bandage can provide support and help keep swelling in check. It should feel snug and supportive, but never tight. If you notice any tingling, numbness, or increased pain, it's too tight.
- Elevation: Whenever you’re sitting or lying down, try to prop the affected joint up above the level of your heart. If your elbow is the culprit, stack a couple of pillows on the armrest of your couch. Gravity is your friend here, helping to drain excess fluid away from the inflamed area.
This simple visual breaks down exactly how to put the R.I.C.E. method into practice.
Running through these steps helps you attack the pain and inflammation from all angles during that critical early window. If your bursitis is centered in the shoulder, you may find that some targeted strategies for shoulder pain relief can offer even more help.
Choosing Between Ice and Heat
One of the most common questions I hear is, "Should I use ice or heat?" It's a great question because using the wrong one at the wrong time can really set you back.
The Golden Rule: Ice is for the first 48 hours to fight fresh swelling and that sharp, acute pain. Heat is for later, once the initial inflammation has calmed down, to soothe lingering stiffness and soreness.
To make it even clearer, this table breaks down the difference so you can choose the right therapy at the right time.
Choosing Between Heat and Ice for Bursitis Relief
| Therapy Type | Best For | How It Works | When to Use |
|---|---|---|---|
| Ice Therapy | Acute pain, swelling, and brand-new injuries or flare-ups. | Constricts blood vessels, numbs the area, and reduces inflammation. | The first 24-48 hours after the pain starts. |
| Heat Therapy | Lingering stiffness, muscle soreness, and general achiness. | Dilates blood vessels, boosts circulation, and helps relax tight muscles. | After the initial swelling is gone (usually after 48 hours). |
Think of it this way: ice puts out the fire, and heat helps clean up and repair the area afterward. Making this switch at the right moment is a key part of an effective at-home treatment plan.
Unlock Deeper Healing with Heat and Massage Therapy
After you've gotten through the initial swelling of a bursitis flare-up, your game plan shifts. The first 48 hours were all about damage control with ice, but now it's time to focus on real healing. This is where heat therapy becomes your best friend, helping to melt away stiffness and kickstart the repair process. By increasing blood flow, heat therapy doesn't just feel good—it supercharges your body's natural healing abilities.

Knowing when to make this switch from cold to warm is one of the most important parts of treating bursitis at home. Applying warmth to the area boosts blood circulation, essentially opening up a superhighway to deliver fresh oxygen and nutrients right where your body needs them most. This increased circulation not only speeds up tissue repair but also helps flush away pain-causing metabolic waste.
The Benefits of Soothing Warmth
When a bursa gets inflamed, the muscles around it tend to lock up and go into protective-spasm mode. Heat is fantastic for convincing those tight, guarded muscles to finally relax and let go.
Not only does this feel incredibly comforting, but it also eases the pressure on the bursa itself, giving it the breathing room it needs to heal.
For example, if you're battling stubborn hip bursitis, a heat pack with a strap is a lifesaver. You can apply that steady, soothing warmth while you’re just relaxing on the couch, allowing the heat to penetrate deep into the tense hip muscles. For shoulder pain, a hands-free wrap can be a game-changer, gently easing that ache while you work and stopping stiffness from setting in. This allows you to receive therapeutic benefits without disrupting your day.
The science backs this up, too. Heat therapy is a proven winner, with some studies showing it can lead to 88-100% pain relief when used properly as part of a treatment plan. It works by opening up blood vessels to improve oxygen flow and calm muscle tension—a big deal since bursitis often targets the 1 in 5 adults over 40 dealing with overuse injuries. The National Center for Biotechnology Information has more on these findings.
Amplify Healing with Gentle Massage
Want to take things to the next level? Try pairing heat with some gentle self-massage. The warmth from a heat pack gets the muscles prepped and pliable, making them much more receptive to massage. This combination is a powerful one-two punch against pain and stiffness. The heat relaxes the muscles, and the massage works to release specific knots and further improve circulation.
After about a 15-minute heat session, use your fingertips to apply light, circular pressure around the sore joint. Avoid pressing directly on the most painful spot. Instead, focus on the muscles that support the area. This simple technique helps break up small knots, reduces muscle spasms, and gives blood flow an extra boost.
Practical Tip: For tricky spots like your shoulder, try this. Place a tennis ball between your back and a wall, then lean into it. You can gently roll the ball around your shoulder blade to work out the tightness without putting direct pressure on the inflamed bursa. The massage helps release trigger points that contribute to your shoulder pain, offering significant relief.
Making that switch from ice to heat is a crucial turning point in getting better. If you're unsure about the timing or the specific roles of each, our guide on heat therapy vs. cold therapy can clear things up. And for those interested in more advanced options, learning how specialized methods like infrared sauna therapy for inflammation can target inflammation might be helpful.
Restore Mobility with Gentle At-Home Exercises
After you've used rest, ice, and maybe a little heat to calm that initial, angry flare-up, the intense pain will likely start to fade. That's the good news. The not-so-good news? The joint often feels stiff, weak, and generally uncooperative. This is a pivotal point in your recovery. Gentle, controlled movement is what will get you back to normal and help you avoid problems down the road.
The idea here isn’t about pushing through pain—far from it. Think of it like coaxing a rusty hinge to open. You need slow, steady, and careful effort, not force. These exercises are specifically designed to improve your range of motion and build up the muscles supporting the joint, which takes a lot of pressure off that healing bursa.
Getting Started The Right Way
Before you jump in, there's one golden rule: listen to your body. If you feel a sharp or worsening pain, stop. That’s your body's signal to back off. A little mild stretching discomfort is totally normal, but sharp pain is a hard no.
Here's a pro tip: try applying a heat pack for about 15 minutes before you start. This warms up the muscles and tissues around the joint, making them much more pliable and ready for some gentle activity.
Exercises for Common Bursitis Locations
Bursitis treatment isn't a one-size-fits-all deal. The right exercises really depend on which joint is giving you trouble. Here are a few safe and effective movements you can try right at home.
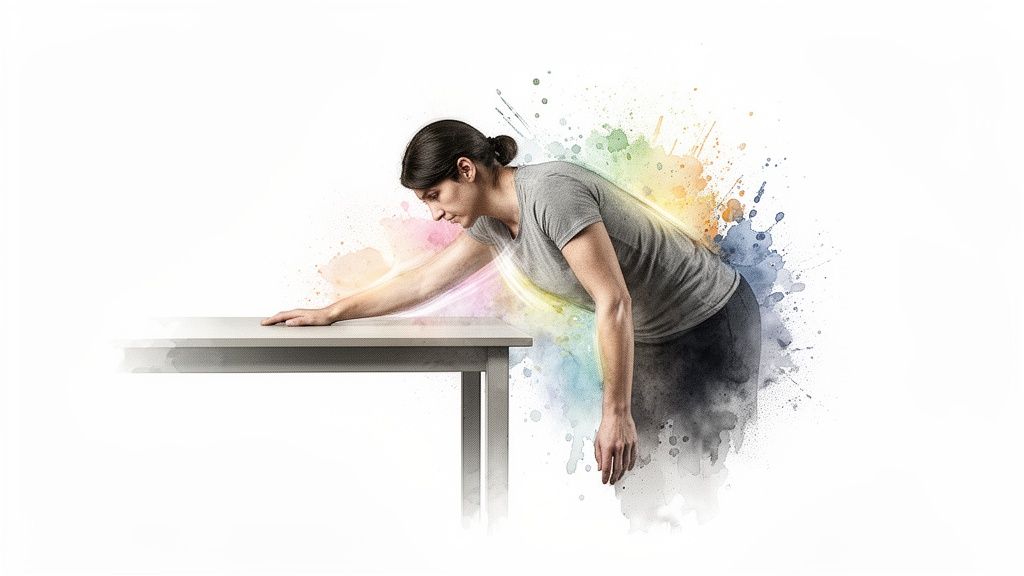
For Shoulder Bursitis:
- Pendulum Swings: Find a sturdy table and lean on it with your good arm for support. Let your sore arm just hang straight down. Now, gently let it swing forward and back. Then side to side. And finally, in small, easy circles. The trick is to let gravity and momentum do most of the work—keep those shoulder muscles as relaxed as possible.
For Hip Bursitis (Trochanteric Bursitis):
- Clamshells: Lie on your side, stacking your hips and bending your knees, with your feet together. Keeping your feet touching, slowly lift your top knee toward the ceiling. Go as high as you can without letting your hips roll back. Hold it for a second, then slowly lower it back down.
- Glute Bridges: Lie on your back with your knees bent and your feet flat on the floor, about hip-width apart. Give your glutes a good squeeze and lift your hips off the floor until you've got a straight line from your shoulders to your knees. Pause briefly, then lower yourself back down with control.
These targeted exercises can be incredibly effective. Globally, bursitis affects over 10 million people each year, often from something as simple as overuse. But there's good news: you can ease this pain with methods that have impressive success rates, and these are physical therapy exercises you can do yourself. One comprehensive study even showed that specific movements can improve mobility and reduce inflammation so well that they serve as the primary treatment for 70% of patients, no medication or surgery needed. You can read the full research to see just how effective this approach can be.
Expert Tip: Don't overdo it. Start with just 5-10 repetitions of each exercise. As you feel stronger and more comfortable, you can gradually increase the count. Consistency is way more important than intensity. A few minutes every single day will get you much better results than one long, painful session once a week.
Bringing these gentle exercises into your daily routine is a proactive way to manage bursitis at home, helping you reclaim your mobility and prevent future flare-ups. If your shoulder is the primary issue, our guide on how to treat frozen shoulder at home has even more targeted strategies you might find helpful.
Keep Bursitis From Coming Back with Smart Lifestyle Habits
Getting over a bursitis flare-up feels great, but the real win is making sure it doesn't happen again. The key isn't some dramatic overhaul; it's about weaving small, intelligent habits into your everyday life. It all starts with figuring out what caused the pain in the first place and then making a few practical adjustments.
Take a look at your daily grind. Most bursitis is a result of repetitive motion or putting too much pressure on one spot for too long. Once you identify these patterns, you can build a solid defense plan to protect those vulnerable joints.
Fine-Tune Your Environment
One of the best things you can do is simply change your surroundings to take the pressure off. This is a big one if your job involves sitting at a desk for hours on end.
Setting up an ergonomic workspace can make a world of difference for elbow and shoulder bursitis. You want your chair adjusted so your feet are flat on the floor and your knees are at a comfortable 90-degree angle. Your keyboard should be close enough that your wrists stay straight and your elbows are relaxed at your sides—not stretched out in front of you.
Real-World Example: Let's say you work from home and have a habit of leaning on your left elbow while you use your mouse. Day after day, that constant pressure is just asking for olecranon bursitis (elbow pain). A simple fix? Get a cushioned mousepad with wrist support and make a conscious effort to keep that elbow off the hard desk. You've just removed the main trigger.
Move Smarter, Not Harder
How you move all day is just as critical as how you sit still. Using your body inefficiently, or with poor mechanics, puts a ton of unnecessary stress on your joints, especially the hips and shoulders.
- Lift with Your Legs: When you have to pick up something heavy, get in the habit of bending at your knees and hips, never your waist. Keep the object tucked in close to your body and let your powerful leg and core muscles do the heavy lifting. This simple technique takes the strain off your hips.
- Support Your Feet: If you’re dealing with hip or knee bursitis, your shoes are your first line of defense. A good, supportive pair with proper arch support helps keep your entire leg in alignment, which minimizes joint stress with every step you take.
- Stretch It Out: You don't need a full yoga class. Just a few minutes of gentle stretching built into your daily routine can keep your muscles loose and your joints moving freely. This helps prevent the muscle tightness that often contributes to bursitis flare-ups.
Small, consistent changes are your best defense against future pain. Making good posture a priority is a foundational step, and you can learn more about the importance of good posture for pain relief in our detailed guide. These habits work together to create a more resilient body, helping you stay active and pain-free.
When It’s Time to See a Doctor for Bursitis
While you can manage most flare-ups of bursitis right at home, it's not always a DIY fix. You need to know when to wave the white flag and call in a professional. Recognizing the signs that point to something more serious is key to getting the right care before a small problem becomes a big one.
The good news is that conservative, at-home strategies really do work. In fact, they have a success rate of up to 90% for resolving bursitis pain without needing more aggressive treatments. Most people start to feel better within a week or two of consistent rest and care. But if you’ve been diligent and the pain just isn’t letting up after four weeks, it's time to get it checked out. For a deeper dive into what that recovery process looks like, you can find some great information about hip bursitis on nyboneandjoint.com.
Don’t Ignore These Red Flags
Some symptoms are more than just standard inflammation—they’re warning signs of a potential infection in the bursa, a condition called septic bursitis. This is a serious issue that absolutely requires medical attention and can't be treated at home.
Keep an eye out for these specific red flags:
- Fever or Chills: A temperature over 100.4°F (38°C) alongside your joint pain is a major red flag.
- Intense Redness and Heat: If the skin over the joint is bright red, visibly swollen, and feels hot when you touch it, that points toward infection.
- Sudden Inability to Move the Joint: A little stiffness is one thing, but if you suddenly can't move the joint at all, that's not normal.
- Sharp, Shooting Pains: Simple bursitis typically feels like a dull ache. If you’re getting sharp, shooting, or electric-like pains, something else might be going on.
If any of these symptoms show up, don't wait it out. Call your doctor right away to get a proper diagnosis.
What to Expect at Your Appointment
So, you’ve decided to make the call. Good move. When you see your doctor, they'll likely start with a physical exam and ask a lot of questions about your symptoms and daily activities to try and figure out what’s causing the irritation.
If your doctor suspects an infection, they may need to take a small fluid sample from the bursa to be tested. It sounds a little scary, but it’s a quick procedure that gives them the definite answer they need to prescribe the right antibiotics and get you on the road to recovery.
For those stubborn cases that aren't infected, your doctor has other tools in their toolbox. They might suggest physical therapy to help strengthen the muscles supporting the joint or recommend a corticosteroid injection to quickly bring down the inflammation. Knowing what to expect can help you walk into that appointment feeling more prepared and in control.
Got Questions About Treating Bursitis at Home? Let's Clear Things Up.
When you're trying to manage bursitis on your own, it's natural to have questions pop up. You start wondering if you're on the right track or if that little twinge you're feeling is normal. Let's walk through some of the most common concerns I hear from people, so you can feel more confident in your recovery plan.
The big question on everyone's mind is, "How long is this going to take?" And the honest-to-goodness answer is: it depends. If you catch a mild flare-up early and are diligent with your care, you could feel a world of difference in just one to two weeks. But for more stubborn cases, you might be looking at several weeks before you're truly back to normal.
Your recovery timeline really hinges on how quickly you jumped into action and how consistent you are. If you tried to "push through the pain" for a while before starting treatment, or if you're a bit hit-or-miss with your rest and exercises, it's just going to take longer.
Can I Use Both Hot and Cold Therapy?
This is a classic point of confusion. Can you use both ice and heat? Yes, you absolutely can! The trick is all in the timing. Think of them as two different tools for two different jobs.
You can definitely use both on the same day, just don't apply them one right after the other. A smart strategy is to use ice after any activity that might stir up a little inflammation. Later on, maybe in the evening, you can switch to heat to soothe stiffness and relax the muscles.
Here’s a real-world example: Say you do your gentle hip mobility exercises in the morning. Right after, you apply an ice pack for 15 minutes to calm things down. That evening, while you’re winding down, you use a heat pack for 20 minutes to ease any lingering achiness before bed.
This approach gives you the best of both worlds—you're actively managing swelling while also promoting circulation and comfort.
How Should I Sleep to Avoid Bursitis Pain?
Trying to get a decent night's sleep when a joint is screaming at you can feel like a lost cause. But tweaking your sleeping position can make a massive difference, helping you manage nighttime pain and avoid that dreaded morning stiffness.
- For Shoulder Bursitis: The golden rule is to avoid sleeping directly on the sore shoulder. If you can sleep on your back, try propping the affected arm up on a small pillow. If you're a committed side-sleeper, lie on your good side and hug a body pillow. This supports the painful shoulder and stops it from slumping forward into an irritating position.
- For Hip Bursitis: Just like with the shoulder, don't sleep on the painful side. When you lie on your good side, tuck a pillow between your knees. This simple trick keeps your hips aligned and prevents your top leg from pulling on the inflamed bursa.
What About Over-the-Counter Pain Relievers?
Pain relievers you can buy at the drugstore, like ibuprofen (Advil, Motrin) or naproxen (Aleve), can be a real lifeline, especially in the first few days. These are known as nonsteroidal anti-inflammatory drugs (NSAIDs), and they pull double duty by reducing both pain and inflammation.
They’re a great tool for taking the edge off so you can rest more comfortably. Just remember, they're a short-term fix, not a permanent solution. Always stick to the directions on the label and have a quick chat with your doctor before starting any new medication, particularly if you have other health conditions or are taking other meds.
At SunnyBay, we've seen firsthand the power of simple, effective home care. Our clinic-grade, microwavable heat packs are designed to deliver deep, soothing relief exactly where you need it. They can be a game-changer for managing bursitis pain and helping you get back to doing what you love. Find the right drug-free pain relief solution for you by exploring our full range of products.