


How to Make a DIY Microwavable Heating Pad for Natural Relief
-
Making your own DIY microwavable heating pad is one of the easiest and most satisfying ways to find natural relief for everyday aches and pains. The concept is simple: you fill a fabric pouch with something like rice or flaxseed, pop it in the microwave, and apply the gentle, moist heat right where you need it. It’s a wonderful, low-cost alternative to an electric heating pad.
The Simple Power of a Homemade Heating Pad
We’ve all been there. Stiffness in your neck after a long day hunched over a keyboard, or menstrual cramps that throw off your entire week. When you're in pain, you want a solution that's fast and uncomplicated. This is where a homemade heating pad feels like a small miracle. It’s more than just a craft project; it’s a wellness tool you can customize completely.
Imagine applying gentle, soothing heat to your lower back after a strenuous workout. That warmth isn't just comforting; it's a form of heat therapy that boosts blood flow, bringing oxygen to tired muscles and helping them relax and recover faster. This is the same principle behind professional massage therapy, where warmth is used to prepare muscles for deeper work. By making your own heating pad, you bring the benefits of heat therapy right into your home.

Why DIY Comfort Works So Well
When you make your own heating pad, you get to call the shots in a way you just can't with a store-bought version. You decide on the fabric, the filler, the size, and the shape to get exactly what your body needs.
- Total Customization: Need a long, skinny wrap for your neck? A small square for jaw pain? You can create the perfect shape for any ache.
- Budget-Friendly: You can make one for just a few dollars using an old cotton pillowcase and a bag of rice from the pantry.
- All-Natural Relief: It’s a fantastic, drug-free way to manage discomfort, putting you in control of your own pain relief.
It's no surprise that people are turning to these simple, effective solutions. The global market for microwavable heating pads was valued at USD 331.91 million in 2025 and is expected to climb to USD 562.84 million by 2032. That kind of growth shows just how much people value drug-free options for managing common pain. You can read the full research about the growing market for heat therapy.
A DIY heating pad is more than just a source of warmth; it's a small act of self-care. Taking a few moments to heat it up and place it on a sore muscle is a signal to your body and mind to slow down, relax, and heal.
Choosing Safe and Effective Materials for Your Heat Pack
The heart of a great DIY microwavable heating pad really comes down to two things: the fabric you choose and what you decide to put inside. Getting these right isn't just about making a better heat pack—it’s about safety. Let's walk through the best options so your creation is both comforting and completely fire-safe.
Think of it like building anything worthwhile. You need a solid foundation. For a heat pack, your materials are that foundation.
Fabric First: The One Rule You Can't Break
When it comes to fabric, there's one simple, non-negotiable rule: use only 100% natural fibers. I'm talking about fabrics like cotton, flannel, muslin, or even linen. These materials are your best friends for this project because they can handle the microwave's heat without melting or, worse, catching fire.
Under no circumstances should you ever reach for synthetic fabrics. Materials like polyester, fleece, or acrylic are a huge no-go. They contain plastics that can melt, scorch, or even ignite when heated. You'd be turning a tool for comfort into a serious fire hazard. Always, always check the label to confirm it says 100% cotton or another natural fiber.
Picking the Perfect Filler
What you put inside your heat pack is what actually holds and radiates that soothing warmth. Your choice of filler will directly affect how long the heat lasts, how the pack feels against your skin, and even the subtle scent it gives off.
Here are a few of the most reliable and popular choices:
- Plain White Rice: This is the classic, go-to filler for a reason. It's cheap, you probably already have it in your pantry, and it holds a gentle, moist heat for a good 15-20 minutes.
- Flaxseed: If you ask me, this is a top-tier choice. Flaxseed contains natural oils that help it retain heat significantly longer than rice—often for 30 minutes or more. It also has a wonderful, silky texture that molds perfectly to your body. You can learn more about its unique properties in our article on flaxseed heating pads.
- Whole Corn (Feed Corn): These larger kernels are fantastic heat holders. They can stay warm for a long time and release a pleasant, almost sweet, earthy smell when heated.
- Buckwheat Hulls: Another great natural option is buckwheat hulls. They are lightweight, allow for good air circulation, and conform beautifully to the contours of your body while retaining heat effectively.
The demand for these simple, portable heat solutions is exploding. The global heating pad market, valued at USD 50.46 billion in 2023, is projected to hit USD 87.46 billion by 2033. This incredible growth is largely driven by microwavable options, which don't require electricity. It makes sense, considering that nearly 20% of U.S. adults deal with chronic pain and are looking for convenient, effective relief.
Comparing Popular Fillers for Your DIY Heating Pad
Choosing a filler can feel overwhelming, but it really comes down to personal preference. What works best for a sore shoulder might be different from what you'd want for menstrual cramps. This table breaks down the most common options to help you decide.
| Filler Type | Heat Retention | Moisture Level | Scent Profile | Best For |
|---|---|---|---|---|
| Rice | Good (15-20 min) | Moist | Neutral, slightly starchy | All-purpose use, beginners, and those who prefer moist heat. |
| Flaxseed | Excellent (30+ min) | Moist | Mild, nutty | Long-lasting heat, conforming to body contours (neck, joints). |
| Whole Corn | Excellent (30+ min) | Dry | Earthy, slightly sweet | Sustained, deep heat and a heavier, more substantial feel. |
| Buckwheat Hulls | Good (20-25 min) | Dry | Earthy, natural | Malleable support, lighter weight, and breathable heat. |
Ultimately, you can't go wrong with any of these natural fillers. My personal favorite for contouring around joints is flaxseed, but I know many people who swear by the hefty warmth of whole corn. Feel free to experiment to find what you love.
Pro Tip: Want a little aromatherapy with your heat therapy? Try mixing a tablespoon of dried lavender buds or chamomile flowers into your filler. Just be sure to avoid adding essential oils directly—they can create dangerous hot spots and become a fire risk in the microwave.
Bringing Your Heating Pad to Life: Sew or No-Sew
Alright, you've picked your fabric and filler, which means it's time for the fun part—actually making your DIY microwavable heating pad. The best thing about this project is how adaptable it is. Whether you're a pro with a sewing machine or just want a fast, simple solution without any stitching, there's a way to do it.
This is where you turn a few basic materials into a genuinely useful tool for soothing aches and pains. For instance, creating a long, tube-shaped pad can mimic the gentle pressure of a massage therapist's hands on your neck, releasing tension while the heat works its magic.
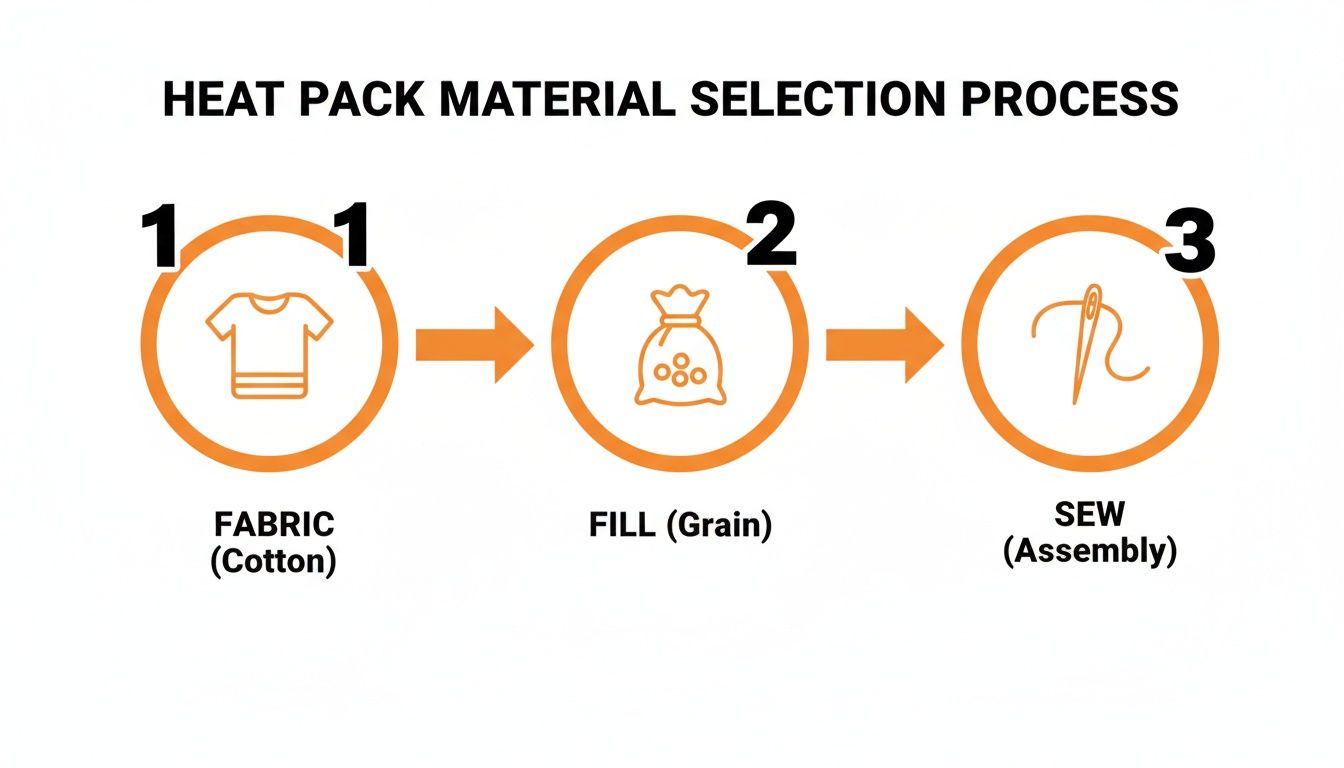
The whole process really boils down to three simple stages.
As you can see, it’s all about picking your materials and putting them together. This visual shows just how straightforward making a quality heating pad can be, no matter your skill level.
The Classic Sewn Method: Building a Lasting Pad
If you own a sewing machine or don't mind a bit of hand-sewing, this approach will give you a durable, professional-feeling heating pad that you can completely customize.
First, cut two identical pieces from your 100% cotton fabric. A 6-inch by 12-inch rectangle is a great all-purpose size to start with. Lay the pieces on top of each other with the pretty sides of the fabric facing inward, then sew around three of the four sides, leaving one of the shorter ends open.
Next, carefully turn the fabric pouch right-side out. It should now look like a little pillowcase. Grab a funnel (or just roll up a piece of paper) and pour in your rice, flaxseed, or other filler until the bag is about two-thirds full. This is important! If you overfill it, the pad becomes rigid and won't drape nicely over your shoulders or back.
To finish, simply fold the raw edges of the open end inward to create a clean seam and sew it shut. I always go back and sew over that final seam a second time. This double-stitching is a small step that provides a lot of peace of mind, ensuring no filler escapes down the line.
Pro Tip for Larger Heating Pads
Planning to make a larger pad, maybe for your lower back or to drape over your shoulders? You’ll want to sew channels into it. Before you add any filler, stitch a few straight, vertical lines down the length of your fabric pouch, spaced about two to three inches apart.
- This creates separate compartments for the filler to sit in.
- It stops all the rice from sliding down to one end when you move.
- Most importantly, it ensures the heat is distributed evenly across the entire pad.
This one extra step is a total game-changer. It elevates a simple pouch into something that feels like a professional-grade therapy tool, delivering consistent, targeted warmth exactly where you need it. It’s the secret to making a truly effective heat pack at home.
The Quick No-Sew Sock Method
No sewing machine? No problem at all. You can whip up a fantastic heating pad in less than five minutes using a clean, long 100% cotton sock. Those lonely socks whose partners have vanished in the laundry are perfect for this.
Just pour your chosen filler directly into the sock until it's about two-thirds full. Like the sewn version, leaving some empty space is the key to making it flexible and comfortable.
To close it up, you've got two easy options. You can either tie a very tight knot in the sock itself or use a short piece of heat-safe cotton twine to tie it off securely. And that's it—you're done! This is my go-to method for creating a long, tube-shaped pad that's perfect for wrapping around your neck or an achy knee. It’s proof that you don’t need any fancy equipment to get fast relief.
Using and Caring for Your Homemade Heat Pack
You’ve done the hard part and made your own heat pack—congratulations! Now, let’s talk about how to use it safely so it gives you soothing relief for a long, long time. Nailing the heating process and a little bit of upkeep is all it takes.
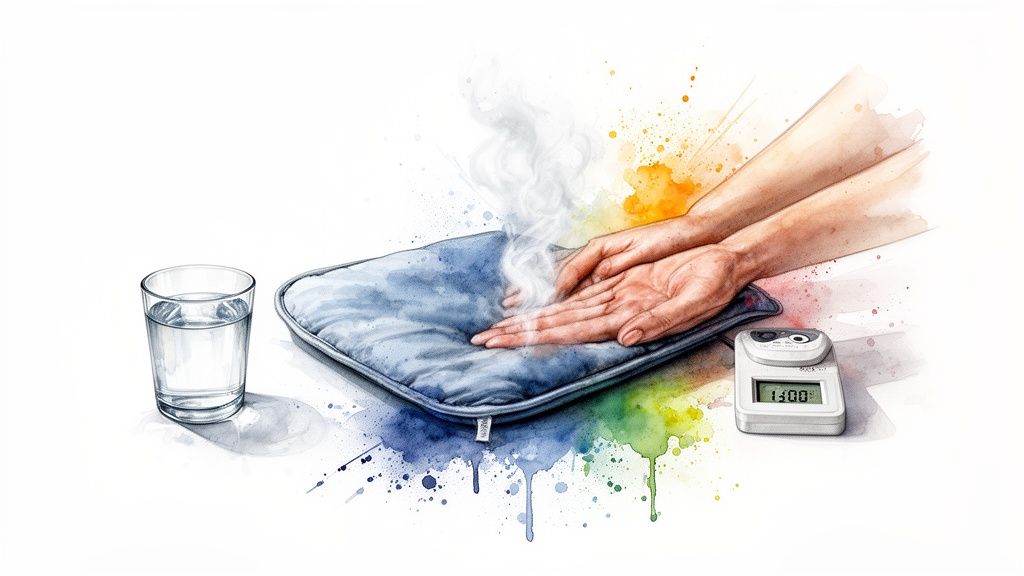
The golden rule here is to start low and go slow. Every microwave is a little different, so don’t just pop it in for three minutes and hope for the best. Instead, heat your new pad in 30-second increments. After each blast, carefully give it a touch to see how warm it’s getting. For most pads of this size, a minute or two is usually all you need.
Overheating is easily the biggest mistake people make. It can scorch the filling (trust me, you don't want that burnt popcorn smell) and even create a fire hazard. Always, always test the heat on your inner arm before laying it across a sensitive spot like your neck. You’re aiming for a comforting warmth, not a searing heat.
Pro Tips for Safe and Effective Use
To really get the most out of your homemade creation, a couple of simple habits can make a huge difference in both safety and effectiveness.
- Add a Cup of Water: When you heat your pad, place a small, microwave-safe cup of water alongside it. This little trick adds moisture to the air inside the microwave, which keeps the filling from drying out and scorching. It also helps create a gentle, moist heat that’s fantastic for penetrating deep into sore muscles.
- Make Sure It Can Spin: Your pad needs to rotate freely on the turntable for the heat to distribute evenly. If it’s too big and gets stuck, you'll end up with dangerous hot spots. Fold it if you have to, just make sure it can turn.
There's a reason these are so popular. Home applications make up a massive 70% of the microwavable heating pad market, with over 70 million units sold annually around the globe. People rely on them for everything from back strains to cramps, which makes knowing how to use them properly absolutely essential.
Keeping Your Heat Pack Clean and Fresh
Since you can't just toss a grain-filled pad into the washing machine, a little spot-cleaning is the way to go. If you happen to spill something on it, don't panic.
Gently dab the stain with a damp cloth and a touch of mild soap. The key is to avoid soaking the fabric, because any moisture that seeps into the filler can cause it to spoil. Always let it air dry completely before you heat it again.
For bigger cleaning jobs, it's worth learning how to wash fabric items without shrinking, as the same principles apply here to protect the outer shell.
When you’re not using your heat pack, find it a clean, dry home like a linen closet or a dedicated storage bin. This will keep it away from dust and any funky kitchen smells. These simple steps are all it takes to keep your DIY heating pad a safe and reliable source of comfort. If you want more specific timing guidance, check out our guide on https://sunny-bay.com/blogs/pain-relief-tips-and-news/how-long-to-microwave-heating-pad.
When to Upgrade to a Professional-Grade Heating Pad
Your DIY microwavable heating pad is a fantastic tool for handling everyday aches and pains. There's a certain satisfaction in creating your own comfort item, and for general soreness, it does the job beautifully. But sometimes, your wellness needs evolve, and what worked for occasional discomfort might not be enough for more persistent issues.
Think of it this way: your favorite cozy sweater is perfect for a chilly evening, but you wouldn't wear it in a blizzard. When you need more specialized, consistent, and targeted relief, it might be time to look into a professional-grade heating pad. This isn’t about tossing out your homemade creation, but about adding a more powerful tool to your pain-relief arsenal.
Scenarios That Warrant an Upgrade
Some situations and health conditions really benefit from features that are tough to duplicate with a homemade solution. If any of the following sound familiar, you might find that a clinic-grade pad makes a world of difference.
Imagine trying to soothe chronic neck pain from long hours at a computer. A simple rice-filled sock will provide warmth, but it's constantly slipping and needs readjustment. A professionally designed neck wrap, on the other hand, is contoured to sit perfectly on your shoulders, delivering consistent, hands-free heat exactly where you need it most. That targeted application transforms simple warmth into true, effective heat therapy.
Here are a few other times when an upgrade is a smart move:
- Chronic Conditions: If you're managing something like arthritis or fibromyalgia, you know that gentle, long-lasting heat is key. Professional pads often use superior fillers like flaxseed, which retains moist heat for far longer than rice, offering a deeper, more therapeutic warmth.
- Targeted Pain Relief: For recurring lower back pain, menstrual cramps, or stiff joints, a pad designed to stay put is a game-changer. Look for options with secure straps or ergonomic shapes that hug the body, ensuring the heat stays concentrated on the problem area.
- Durability and Hygiene: When you're using a heating pad daily, it needs to be built for the long haul. Clinic-grade pads often feature durable fabrics like anti-pill fleece, reinforced stitching, and—crucially—removable, machine-washable covers. This makes keeping it clean a breeze and ensures it can stand up to constant use.
A professional heating pad isn't just a bag of hot filler; it's an intelligently designed therapeutic tool. The ergonomic contours, secure fastenings, and advanced materials are all engineered for one purpose: to deliver heat more effectively and conveniently for serious, long-term relief.
Making the switch is a practical decision when your pain-relief needs become more specific. While your DIY microwavable heating pad is perfect for temporary soreness, a professional pad is a worthwhile investment in consistent, hassle-free comfort for chronic conditions.
For a deeper dive into your options, check out our article comparing electric vs microwavable heating pads.
Got Questions About Your New DIY Heating Pad?
So, you’ve just finished making your own microwavable heating pad. Awesome! It's totally normal to have a few questions before you start using it, especially when it comes to safety and getting the best results.
Think of this as your go-to guide for using your new creation with confidence. We'll walk through everything from adding a little aromatherapy to keeping it clean, so you can just focus on enjoying that cozy, soothing warmth.
Can I Add Scents or Other Custom Touches?
Absolutely! Combining gentle heat with calming scents is a fantastic idea, but you have to do it the right way to avoid any fire risks.
A word of caution: Never put essential oils directly on the filling before you microwave the pad. Concentrated oils can create super-hot spots that are a serious fire hazard. If you want to use oils, add just 1-2 drops to the fabric after it’s fully heated.
A much safer—and, in my opinion, better—way to get that aromatherapy benefit is by mixing dried herbs right in with your filler. Toss in a tablespoon or two of dried lavender buds or chamomile flowers before sewing it up. They'll release a subtle, lovely scent every time you heat the pad. The calming aroma of lavender, for example, is perfect when you're using the pad to melt away tension in your neck and shoulders.
How Do I Get the Most Heat and Make It Last?
How long your pad stays warm really comes down to its size and what you put inside. A standard rice-filled pack will usually give you a solid 15-20 minutes of comforting warmth.
Looking for something that holds heat a bit longer? Give flaxseed a try. Thanks to its higher oil content, a flaxseed pad can easily stay warm for 30 minutes or more.
A few key tips to keep in mind:
- Avoid Overheating: If you smell anything burning, that's a red flag. The filling has scorched, and you need to stop using the pad immediately.
- Heat in Bursts: Always heat your pad in 30-second intervals to prevent scorching.
- Add Moisture: Placing a small cup of water in the microwave alongside your pad helps distribute the heat more evenly and keeps the filling from drying out.
- Cleaning: Never, ever submerge your heating pad in water. Just spot-clean the fabric with a damp cloth to keep it fresh.
When you need reliable, deep-penetrating heat without the DIY effort, professional-grade options are the way to go. SunnyBay offers a range of clinic-quality heating pads designed for targeted relief. Our products are made with premium materials and ergonomic designs to deliver consistent, long-lasting therapy. See the difference for yourself at https://sunny-bay.com.